Needle Crafts for Kids

storybook quilt
Capture anecdotes and stories about your family with a beautiful storybook quilt.
©2007 Publications International, Ltd.

Needle crafts for kids are a great way for them to learn (or perfect) a new hobby and create something beautiful.

These crafts are designed to teach kids about sewing while resulting in a good-looking craft. These needle crafts will have your kids stitching their way to fun creations since they are "sew" easy to do.

Advertisement

Follow the links below to learn how to make needle crafts for kids:

Tote It

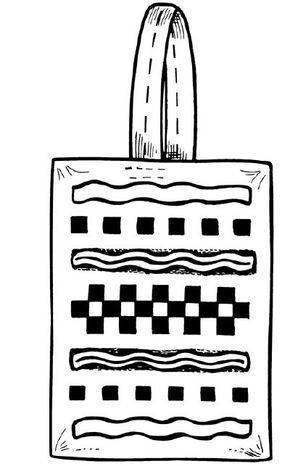
Design a portable piece of art that can carry your children's belongings.

Sewing Cards

These cards are sew easy because your kids won't need a needle and thread -- just yarn and cardboard.

Storybook Quilt

Share some of your family's favorite pictures, stories, or family sayings to create a quilt.

Backseat Tote

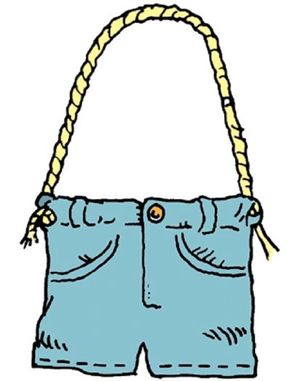
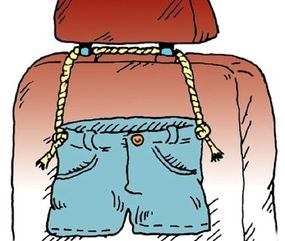
If you're tired of the kids losing their books, food, or other items in the car, make a tote to hold all the important car necessities.

Charm Bag

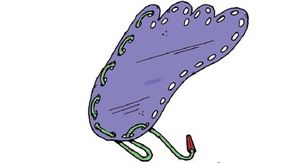
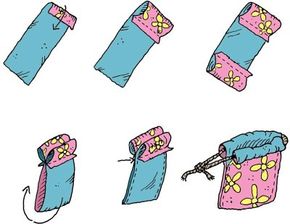
Sew a beautiful bag to hold your children's most precious small collectibles.

Pick up a needle and thread, and keep reading to learn how to create and decorate a tote.

For more creative crafts and activities for kids, check out:

Advertisement

Tote It for Kids

tote it denim bag
Sew and decorate a unique denim bag, and tote it around for everyone to see.
©2007 Publications International, Ltd.

This Tote It craft for kids is the most usable piece of art your kids will ever create -- so they'll be sure to tote it around and show it off.

What You'll Need:

  • 1 yard of bright-colored denim fabric
  • Tape measure
  • Scissors
  • Sewing machine
  • Iron-on fabric adhesive
  • Iron and ironing board
  • Fabric scraps
  • Fabric paint

How to Create a Tote It:

Step 1: Have your kids cut a 14x9-inch piece of denim fabric for the bag and a 3x15-inch piece for the handle. (To make a book bag, cut a 22x12-inch piece for the bag and a 24x3-inch piece for an over-the-shoulder handle.)

Advertisement

Step 2: Hem one 14-inch side on the larger piece of fabric. Fold the fabric in half with the seam of the hemmed edge facing out. Sew the two sides of the fabric together, running a stitch along the bottom and up the side of the folded fabric. Turn the bag inside out.

Step 3: Decorate the bag with fabric. Iron the fabric adhesive to the back of some fabric scraps.

Step 4: Cut out shapes or a design from the fabric. Remove the paper backing from the adhesive. Place a fabric shape on the tote bag, and iron it in place.

Step 5: Continue decorating the tote bag with the remaining fabric shapes. Use fabric paint to outline the shapes or to add more shapes. Let the paint dry.

Step 6: To make the tote bag handle, fold the 3x15-inch piece of fabric in thirds. Sew along the length of the fabric to stitch it together. Sew each end of the handle to the inside of the bag. Sew several stitches to secure the handle.

Keep reading to learn how to make sewing cards that don't require a needle or thread.

For more creative crafts and activities for kids, check out:

Advertisement

Sewing Cards for Kids

sewing cards
Put away your needle and thread and dig out colored yarn for these sewing cards.
©2007 Publications International, Ltd.

Your kids won't need a needle and thread to create sewing cards -- these cards are made with yarn and are cut out.

What You'll Need:

  • Sturdy cardboard (measuring about 6x6 inches for each card)
  • Pencil
  • Scissors
  • Hole punch
  • Yarn (about two feet for each card)
  • Clear tape

How to Make Sewing Cards:

Step 1: Make several outline drawings -- animals, people, whatever your kids want -- on several pieces of cardboard, then cut out the shapes. Punch holes around the edges every 1/2 inch or so.

Advertisement

Step 2: Tie a knot in one end of a piece of yarn, then wrap a small piece of tape around the other end (just like on the end of a shoelace) so that your kids can easily push the yarn through the holes in the cardboard. Sew the card by threading the holes with different pieces of colored yarn.

Step 3: Your children can even try sewing different pieces together to make three-dimensional shapes. For example, sew six squares together to make a cube. Sew eight triangles to make a diamond, or four triangles and one square to make a pyramid. What other shapes can your kids make?

Keep reading to learn how to preserve a piece of your family with a handmade quilt.

For more creative crafts and activities for kids, check out:

Advertisement

Storybook Quilt for Kids

storybook quilt
Capture anecdotes and stories about your family with a beautiful storybook quilt.
©2007 Publications International, Ltd.

Stitch together a storybook quilt for kids, with squares of family pictures, sayings, and stories to tell the story of your family.

What You'll Need:

  • Poster paper
  • Ruler
  • Scissors
  • Family pictures
  • Markers
  • Clear vinyl adhesive paper
  • Hole punch
  • Large plastic needle
  • Yarn

How to Make a Storybook Quilt:

Step 1: Use a ruler to measure and punch holes around the outer edges of the squares. Be sure the holes of each square line up with the holes of the squares next to it. Thread a large plastic needle with yarn, and sew the squares together for your quilt.

Advertisement

Step 2: Glue a picture of each family member on a separate square -- don't forget your pets. Then write anecdotes, family sayings, or anything else that explains who your family really is. When all the squares are completed, cover each one with clear vinyl adhesive paper.

Step 3: Cut the poster paper into 6 x 6-inch squares. Make as many as you would like, but make enough so that there are the same number down as across when placed as a grid pattern -- for example, four down and four across.

Keep reading to learn how to use an old pair of pants to help corral your children's items in the car.

For more creative crafts and activities for kids, check out:

Advertisement

Backseat Tote

backseat tote
Use an old pair of pants to make a backseat tote, which will help hold your favorite things in the car.
©2007 Publications International, Ltd.

When your kids are in the back of the car, it's easy to lose things under the seat, so design a backseat tote to keep all their stuff in one place.

What You'll Need:

  • 1 pair old pants with belt loops
  • 2 feet of rope (or cord or heavy string)
  • Scissors
  • Needle and thread (or sewing machine)
  • Fabric paint or permanent markers (optional)

How to Make a Backseat Tote:

Step 1: Cut the legs off the pants. With a sewing machine or needle and thread, sew the legs of the pants shut.

Advertisement

Step 2: Tie one end of the rope to a belt loop on the left side of the pants. Tie the other end of the rope to a belt loop on the right side of the pants.

backseat tote
Once your kids finish decorating the backseat tote, hook the rope over the headrest of the seat in front.
©2007 Publications International, Ltd.

Step 3: Decorate the tote with fabric paint or markers. Hook the rope over the back of the headrest of the driver's seat or passenger seat. Tie one end of the rope to a belt loop on the left side of the pants. Tie the other end of the rope to a belt loop on the right side of the pants.

Step 4: Use this travel tote to hold books, magazines, notepads, snacks, or whatever your kids want. The pants pockets are perfect for small items such as coins and pens. They can even take the travel tote with them as a carryall.

Keep reading to learn how to design a bag to hold your children's valuables.

For more creative crafts and activities for kids, check out:

Advertisement

Charm Bag

charm bag
By making a drawstring, the charm bag will be able to hold all your children's small valuables.
©2007 Publications International, Ltd.

Here's a charm bag for kids, to hold small objects that bring good luck or happy memories.

What You'll Need:

  • 1 piece of cloth or felt (4x12 inches)
  • 1 piece of string or cord (at least 10 inches long)
  • Needle and thread (or sewing machine)

How to Make a Charm Bag:

Step 1: Fold the short end of the cloth down one inch, making a flap. Sew the flap to the cloth about 1/4 inch from the edge. Leave the ends open.

Advertisement

Step 2: Follow the same steps for the other end of the cloth. This makes two "tubes" at opposite ends of the cloth. Later, your children will put a piece of string through these tubes to make a drawstring.

Step 3: Fold the cloth in half. If the cloth has a pattern, fold so the pattern is on the inside. Sew the sides of the cloth together, about 1/4 inch in from the edge. Stop sewing right before your children reach the tubes.

Step 4: Turn the charm bag inside-out. Push a piece of string through both tubes and tie the ends of the string together.

For more creative crafts and activities for kids, check out:

Advertisement

Advertisement

Loading...