How to Make Paper Planters

You bring the paper, nature brings the plants.

Make your garden extra special and environmentally friendly by creating handmade paper planters with these paper planter crafts for kids.

But assembling the paper planter is only half the project. Once completed, kids can decide what goes in the planter. Whether the plants are real or made from your stash of craft materials, these paper crafts will brighten any room in no time.

Advertisement

Choose a paper planter project below to get started:

Four Seasons Tree

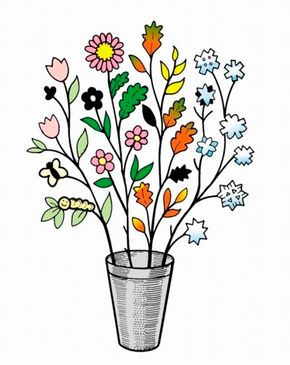
Most plants can't survive the winter months, but with this craft you can make a decorative paper planter that will last all year long.

Green Grass Planter

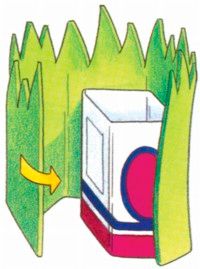
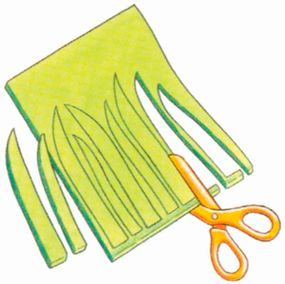
Since the grass is always greener on the other side, you can create two of these Green Grass Planter crafts -- one for each side!

Herb Garden Planter

Create a useful planter to grow your favorite herbs in. Plant your herb garden and watch it grow in this paper planter.

Mini Flowerpots

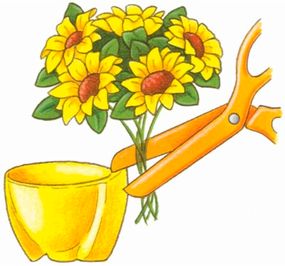
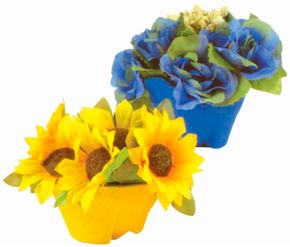
Bigger isn't always better. Paint a planter to match your flowers in this kids' craft for Mini Flowerpots.

Pinwheel Windowsill Garden

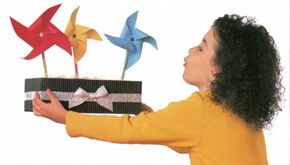
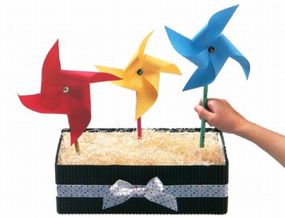
Spin your paper craft skills in the right direction with this paper planter.

Continue on to the first craft to see four seasons become one.

For more paper-related kids' crafts, see:

Advertisement

Four Seasons Tree

Four Seasons Tree
Four Seasons Tree paper planter
Publications International, Ltd.

With this paper planter you don't have to wait for the next holiday to celebrate. Create a paper craft that's a tree for all seasons.

What You'll Need:

  • Thin tree branches or twigs
  • Construction paper
  • Scissors
  • Markers or colored pencils
  • Lightweight string or transparent tape
  • Vase

How to Make Four Seasons Tree:

Step 1: Find 4 similar-size branches with several twigs coming off of them. Decorate each branch so it represents either winter, spring, summer, or fall.

Advertisement

Find similar-size branches to decorate.

Step 2: Cut snowflakes, flowers, bugs, and leaves from construction paper. Decorate the shapes with markers or colored pencils.

Step 3: Tie or tape the shapes on each branch for each of the four seasons. Arrange the branches in a pretty vase to make a colorful centerpiece for a table.

Create your own grass to compliment the real thing in the next craft.

For more paper-related kids' crafts, see:

Advertisement

Green Grass Planter

Green Grass Planter paper craft

The Green Grass Planter is one way to keep plants green! This paper planter craft is great for plants or flowers, and it really brings the outdoors in.

What You'll Need:

  • 1-quart cardboard milk carton
  • 12x18-inch piece green craft foam
  • 1 yard floral ribbon
  • Ruler
  • Pencil
  • Craft knife
  • Medium-grade sandpaper
  • Scissors
  • Craft glue
  • 2 large rubber bands
  • Green felt-tip marker

How to Make Green Grass Planter:

Step 1: Measure and mark a line 5-1/2 inches up from the bottom edge of the milk carton. Cut off the top portion using a craft knife. Lightly sand the sides of the carton to remove the waxy sheen.

Advertisement

Step 2: Cut a piece of craft foam to measure 12x9-1/2 inches. Place the grass pattern along the long edge of the craft foam, and trace around the top. Cut out with scissors.

Wrap foam around the carton.

Step 3: Wrap the foam around the carton, overlapping the edges in the center of one side of the carton. Crease the corners of the foam, and then remove it.

Step 4: Apply glue all around the 4 sides of the milk carton. Wrap the craft foam around the carton. Apply more glue to the overlapping edge of the foam, and smooth in place.

Step 5: Secure with 2 rubber bands to hold the grass in place while the glue dries (approximately 1 hour).

Step 6: Using the patterns for the longer grass piece and the individual blades of grass, trace and cut individual blades of grass from the remaining craft foam, varying the heights and shapes of each blade a little bit.

Step 7: Using green marker, draw a vein down the center of each blade. Glue them on top of the foam around the carton.

Cut out individual blades of grass.

Step 8: Wrap a ribbon around the carton, and tie in a bow. If needed, apply a few drops of glue to hold the ribbon in place.

Growing your own herbs is easy in the next paper planter craft.

For more paper-related kids' crafts, see:

Advertisement

Herb Garden Planter

Herb Garden paper planter craft

With an Herb Garden Planter, you can plant some seeds and watch them grow into tasty herbs. The next step? Finding which herb will go best with dinner. This is a paper craft that keeps giving long after the glue has dried.

What You'll Need:

  • Foam egg carton
  • Acrylic paint
  • Stickers
  • 6 toothpicks
  • Potting soil
  • Seeds (we suggest rosemary, thyme, chives, dill, basil, oregano)
  • Colored card stock
  • Paintbrush
  • Scissors
  • Ruler
  • Fine-point marker
  • Clear tape

How to Make Herb Garden Planter:

Step 1: Cut off the lid and front flap of the carton; set aside. Paint the carton; let dry. (You may choose to skip this step if you like the original color of the egg carton.) Decorate the outside and top of the carton with stickers.

Advertisement

Step 2: Using a toothpick, poke a hole in the bottom of each egg cup. This will allow the water to drain after you've planted the seeds.

Poke a hole in the bottom of each egg cup.

Step 3: Fill each egg cup with potting soil. Drop a few seeds into each cup, making sure to keep track of which seeds are in which cup. Cover the seeds with a little more soil, and add a small amount of water to each.

Step 4: Cut 6 small rectangles of card stock (approximately 1-1/2x3/4 inches each). Label each slip with the name of one of the herbs.

Step 5: Tape each labeled slip to a toothpick, and place each toothpick in the corresponding egg cup.

Step 6: Set your garden in a sunny place on top of the lid you cut off in step 1, and water the plants according to the directions on the seed packets.

Create pretty little bursts of color in the next paper planter craft.

For more paper-related kids' crafts, see:

Advertisement

Mini Flowerpots

Mini Flowerpots paper planters

Make Mini Flowerpots and you can have a pansy in a pot, red roses blooming year 'round, or sunflowers bringing sunshine in. Grow a miniature garden in a simple egg cup in this paper planter kids' craft.

What You'll Need:

  • Paper egg carton
  • Acrylic paint
  • Silk flowers and/or dried flowers
  • Scissors
  • Paintbrush
  • Craft glue

How to Make Mini Flowerpots:

Step 1: Cut 1 cup from the egg carton. Trim the edges of the cup as smoothly as you can.

Advertisement

Step 2: Paint the cup the color of your choice, keeping in mind the color flowers you have chosen. If needed, apply a second coat of paint. Let dry.

Step 3: Select enough flowers to fill the cup, and arrange them in a pretty cluster. Cut the stems so the flowers fit inside the cup.

Cut the flower stems to fit in the cup.

Step 4: Apply craft glue along the top inside edge of the cup, and glue the flowers in place. Glue the individual flowers to each other if necessary. Let dry.

If you'd like, paint a few designs around the cup. Check out these adorable hearts!

Decorate a mini flowerpot with hearts.

Plant pinwheels in your paper planter in the next craft.

For more paper-related kids' crafts, see:

Advertisement

Pinwheel Windowsill Garden

Pinwheel Windowsill Garden paper planter

The Pinwheel Windowsill Garden paper planter makes it easy to grow a colorful garden right in your own home, even during the dead of winter. Just blow gently to set your pinwheel flowers in motion on this paper craft.

What You'll Need:

  • Shoe box
  • Floral foam block
  • 2 pieces green corrugated cardboard, 3-1/2x18 inches each
  • 2 yards satin ribbon, 7/8 inch wide
  • Red, blue, and yellow paper
  • 3 new pencils
  • 3 sequins
  • 3 straight pins
  • Plastic drinking straw, cut into 1/4-inch pieces
  • Excelsior or Easter basket grass
  • Serrated knife
  • Pencil
  • Ruler
  • Scissors
  • Glue

How to Make Pinwheel Windowsill Garden:

Step 1: Cut floral foam with knife to fit shoe box. Fill with crumpled paper, if needed. Glue cardboard to box.

Advertisement

Step 2: Measure ribbon around the box, adding a 1-inch overlap. Cut and glue ribbon to box. Tie a bow with the remaining ribbon. Glue to box front.

Step 3: Use a ruler to draw a square on a sheet of colored paper. We used 5- and 6-inch squares. Cut out squares.

Step 4: Use the ruler to draw diagonal lines from corner to corner, making an X. Measure about 1/2 inch from the point where the diagonal lines cross and make a mark. Cut on the lines to the mark.

Step 5: Lightly number all the corners from 1 to 8. Bring corners 2, 4, 6, and 8 into the center, overlapping corners. Place a sequin over corners.

Fold corners to the center.

Step 6: Push straight pin through sequin, all corners, and the center X. Insert the pin through straw piece and into pencil eraser. Make 2 more pinwheels.

Step 7: Cover foam with excelsior. Push pencils into foam.

Push pencils into foam.

For more paper-related kids' crafts, see:

ABOUT THE CRAFT DESIGNERS

Pinwheel Windowsill Garden by Sharon Broutzas, Rice Freeman-Zachery, Connie Matricardi, Susan Milord, Lynnette Schuepbach, Kim Solga, and Florence Temko

Advertisement

Advertisement

Loading...