How to Make Paper Flowers

Make individual paper flowers or go all-out with this paper flower bouquet!

Making paper flowers for kids is a fun paper activity, and the flowers kids make will last a long, long time! All it takes is some colorful tissue paper and a healthy dose of imagination. Use our step-by-step instructions to make a paper flower garden.

Learn how to make paper flowers for kids with the craft instructions on the following pages.

Advertisement

  • Paper Carnations These sweet, simple flowers will be the center of attention.
  • Paper Roses These roses don't wilt, they don't have thorns, and they can be any color of the rainbow!
  • Tiny Paper Flowers These tiny paper flowers make a big statement.
  • Tissue Bouquet Why stop at just one? Craft a whole bouquet of beautiful flowers.

Learn to transform used wrapping tissue into a gift of paper carnations in the next section.

Advertisement

Paper Carnations

Paper carnations are an easy way to start crafting paper flowers.

Paper carnations are a perfect introduction to paper flower crafts. Follow these simple instructions to bring tissue paper to life.

What You'll Need:

  • Brightly colored tissue paper
  • Ruler
  • Dull pencil
  • Scissors
  • Green chenille stems
  • Clear tape
  • Green florist tape

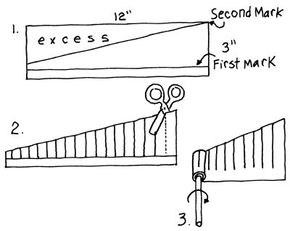
Step 1: Using 3 layers of 1 color of tissue paper, cut out a section about 12 inches long and 3 inches wide.

Advertisement

Step 2: In the lower left-hand and right-hand corners, make a pencil mark 1/2 inch above the bottom edge.

Step 3: Now carefully draw a straight line across the tissue from pencil mark to pencil mark. Also in the lower left-hand corner, make a second mark 1/2 inch above the line.

Step 4: From the second mark, draw a diagonal line to the top right corner. Cut off the excess tissue paper above the diagonal line.

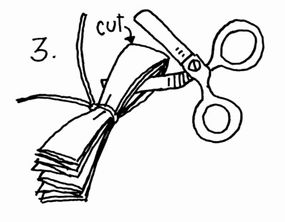
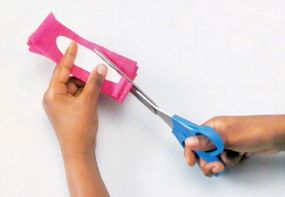
Step 5: All the way across the tissue paper, make narrow cuts from the top diagonal edge down to the straight line across the bottom.

Step 6: Place the top part of the chenille stem in the corner of the short end, and tape it down.

Step 7: Roll the pipe cleaner toward the long end. Make sure the bottom edges of the tissue paper always line up.

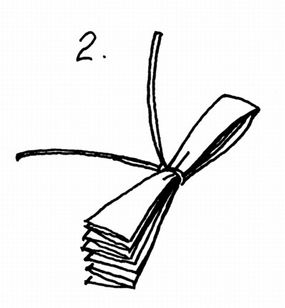
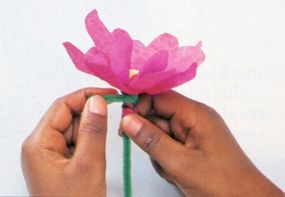
Step 8: When done, tape the bottom edge of the tissue paper down. Wrap green florist tape around the top of the chenille stem and 1 inch up the flower.

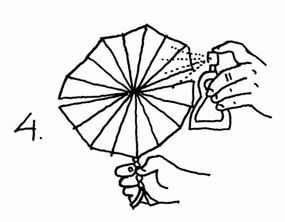
Step 9: Now slowly pull down and fluff out the flower "petals," working from the outside in toward the center.

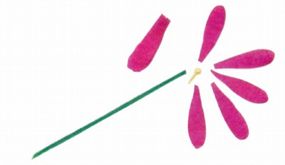
Behold the finished carnation! Experiment with other color combinations and shapes of petals to make other kinds of flowers.

Next, learn to craft a feast for the eyes from a product intended for the nose. Keep reading to find out more.

Advertisement

Tissue Roses

Create accordian-like folds in the tissue.

This paper craft will bloom before your eyes! People love getting flowers, but they hate seeing the delicate petals fade and fall. These lovely tissue paper flowers never wilt, and they're easy to make.

What You'll Need:

  • Tissues
  • Floral wire
  • Scissors
  • Floral tape (optional)
  • Floral perfume (optional)

Step 1: Take a single tissue (the kind you wipe your nose with), and spread it out flat in front of you. The long sides of the tissue should be on the top and bottom, the short sides on the right and left.

Advertisement

Step 2: Fold about 1/2 inch of the bottom of the tissue up. Then fan-fold the next 1/2 inch to the back. Keep fan-folding the tissue until it is completely folded.

Step 3: Once you have the tissue folded into what looks like a long strip, fold it again, this time matching the short ends to each other -- it will have a single bend in the center.

Bind the tissue with wire in the center.

Step 4: Take a 12-inch piece of wire and tightly bind the center of the strip.

Step 5: Cut the folded end. Begin to peel the layers of tissue, opening the flower to form a fluffy, round blossom.

Cut at the fold of the tissue.

Step 6: Wrap the very bottom of the flower (where the wire holds the tissue) and the wire with floral tape. Very lightly mist the flower with perfume.

Freshen your flower with your favorite scent.

Enjoy this flower -- with proper care it will last a long, long time.

After a couple of large flowers, learn how to make several more tiny flowers. Find out how on the next page.

Advertisement

Tiny Paper Flowers

This paper craft takes tissue paper and toothpicks and makes them into some very small bouquets. Use these tiny paper flowers to decorate birthday presents, create floral jewelry, or trim craft projects.

What You'll Need:

  • Blunt scissors
  • Colored tissue paper
  • Toothpicks
  • Craft glue

Step 1: To make a tiny primrose, cut eight 1/4×1-1/2-inch strips of tissue paper.

Advertisement

Step 2: Wrap one end of 4 strips around the toothpick about 1/4 inch from the end. Wrap one end of the remaining 4 strips around the toothpick about 1/2 inch from the end.

Step 3: Fold the "petals" back. To make a tiny daisy, cut several 3/4×3-inch strips of tissue paper.

Step 4: Use scissors to round off one end of each strip. Wrap and glue the uncut ends of the strips around a toothpick.

Step 5: To make a lily, cut a half circle from the tissue paper. Wrap the circle around the toothpick like a cone. Glue in place.

The grand finale of paper flower crafts transforms crepe paper into a large, colorful flower bouquet. Learn more on the next page.

Advertisement

Paper Flower Bouquet

The paper flower bouquet is a great gift.

This fun paper craft turns colorful crepe paper into a beautiful, long-lasting paper flower bouquet -- a delightful surprise for mom or a favorite friend!

Make a lavish bouquet following the instructions below, or use variations to invent new flowers.

Advertisement

What You'll Need:

  • Crepe paper in assorted colors
  • Green chenille stems

Tools:

  • Scissors
  • White paper
  • Round pencil or pen or dowel

Use these instructions to make cosmos, daisies, and dogwoods. For other flowers, follow the general instructions, plus the variations that follow.

Step 1: Download the Paper flower bouquet patterns as a PDF. Print it out, then cut out the flower petal pattern of your choice. Cut a strip of crepe paper and fold it into 6, 8, or 12 sections (depending on the flower you want to make). Place the pattern for that flower petal on top and cut around the edges.

Cut the tissue along the pattern.

Step 2: Make a flower center by cutting two 1-3/4-inch squares of yellow tissue. Wad a square into a ball, and wrap the other around it, gathering the edges at the bottom and creating a rounded top.

The tissue flower begins to take shape.

Step 3: Roll a petal around a pencil. Push each side of the roll with your fingers to crumple the paper in the center. Unroll the petal and flatten it gently. Repeat with other petals.

Step 4: Hold the flower center in one hand and place petals all around it, pinching the paper ends together. Twist one end of a green chenille stem tightly around the petals. Gently pull the petals until your flower is arranged.

Use the stem to secure the petals.

Advertisement

Lots More Information

Related Articles

ABOUT THE CRAFT DESIGNERS

Tissue Bouquet by Sharon Broutzas, Rice Freeman-Zachery, Connie Matricardi, Susan Milford, Lynette Schuepbach, Kim Solga, and Florence Temko

Advertisement

Loading...