Nature Craft Projects for Kids

Sparkling Stained Glass
Make a sparkling stained glass ornament.
©2007 Publications International, Ltd.

Kids love learning about the world around them and making their own crafts. How about combining these two activities? The nature craft projects for kids in this article do just that.

The projects listed below include crafts that will encourage kids to think about the natural world around them in new ways. For instance, the spore prints project teaches kids how mushrooms reproduce while they are making beautiful prints they can hang on their bedroom wall.

Advertisement

Find instructions for these projects and more in the links that follow:

Spore Prints

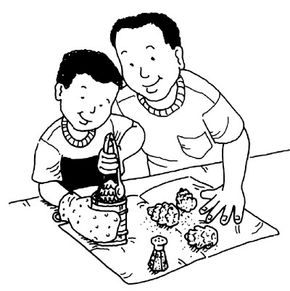
Watch nature create its own artwork by making spore prints with mushrooms.

Apple Tree Centerpiece

Appreciate the beauty of fresh apples by making this centerpiece for your table.

Make a Plant Press

With this plant press, you can dry flowers to use in many nature projects and crafts.

Do-It-Yourself Fossils

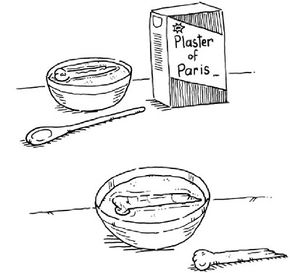
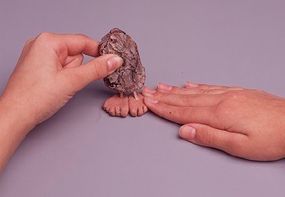
Imitate the fossilization process by making realistic-looking fossils out of clay and plaster.

Fire-Starting Pine Cones

Nothing says, "autumn," like the smell of a fire crackling in the fireplace and the classic scent of pine cones. With this nature craft, you can enjoy both of these aromas together.

Seashell Box

Like an oyster holding a beautiful pearl, this hinged seashell box is the perfect place for your child to store their treasures.

Nature Diorama

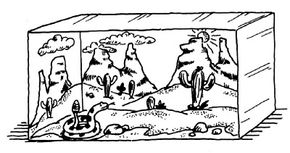
Create the natural paradise of your dreams when you make your own nature diorama.

Grass Prints

Try out a new printing medium -- grasses! Believe or not, but you can make beautiful and interesting patterns using grass.

Beach in a Bottle

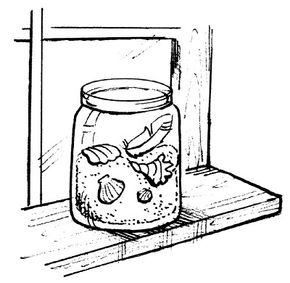
With this craft, you can save a bit of summer in a bottle to look at all year long.

Plaster Forever Fish

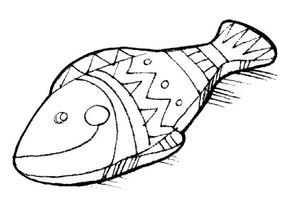
You can't save your prize fish forever, but you make a plaster replica to save as a memento with this craft project.

Sparkling Stained Glass

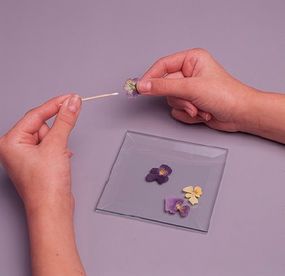
Use dried flowers to make a beautiful glass ornament that gives the impression of stained glass.

Fun-Loving Forest Elves

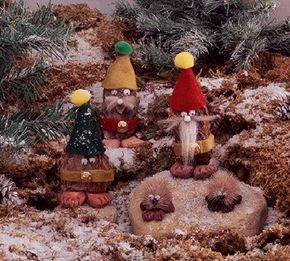
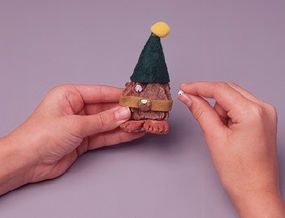
Learn how to make cute little elves and their hedgehog companions out of natural materials.

Keep reading to learn about the first of the projects: spore prints!

For more ideas on nature-related crafts and activities to do with kids, see:

Advertisement

Spore Prints for Kids

Whether you forage for them in wild or buy them at your local grocery store, you can use any type of mushroom to make spore prints. Check out this cool nature craft project for kids.

What You'll Need:

  • Mushroom caps
  • White unlined index cards
  • Black paper
  • Drinking glass or bowl
  • Hair spray or acrylic fixative

Step 1: Find a mushroom in the wild, or get some from the store. (Be careful when handling wild mushrooms -- don't eat them!) You will have to find some with the caps open. Look underneath the cap. The gills inside are lined with structures that make and release spores by the millions. Each spore can grow into a new fungus.

Advertisement

Step 2: Cover half of an index card with black paper.

Step 3: Pop out the stem from the mushroom cap and place the cap on the card so that half is on the black paper and half on the white.

Step 4: Cover with a glass or bowl and let the cap sit overnight.

Step 5: The next day remove the glass and the mushroom cap. You should see a print of the mushroom spores. Pale spores will show up on the black paper, while darker ones will show on the white.

Step 6: Ask an adult to spray the print with hair spray or acrylic fixative to keep it from smearing.

For a different type of nature craft project, make a pretty centerpiece for your table with fresh apples. Learn how on the next page.

For more ideas on nature-related crafts and activities to do with kids, see:

Advertisement

Apple Tree Centerpiece for Kids

Be the apple of someone's eye with this apple tree centerpiece for kids. Learn how to make this alluring nature craft below.

What You'll Need:

  • Styrofoam cone
  • Apples
  • Greenery
  • Plate
  • Toothpicks

Step 1: Buy a Styrofoam cone with a flat top at a crafts store. If your cone has a pointed top, cut off the point. Place the Styrofoam cone on a plate. Gather plenty of shiny red apples and some greenery, such as apple leaves or evergreen boughs.

Advertisement

Step 2: Push a toothpick halfway into each apple. Then attach the apples to the Styrofoam cone by pushing the toothpicks into the cone. Start by making a row of apples around the bottom of the cone, with the apples resting on the plate. Then make another row right on top of that, and work your way to the top. It will work best if you put the bigger apples on the bottom, and the smaller ones on top. The last apple should go right on top of the cone.

Step 3: Use the greenery to fill the spaces between the apples. You should be able to stick the ends of the leaves or boughs right into the cone. Finally, decorate the edges of the plate with greenery, too.

You can also make the centerpiece out of other fruits, such as oranges or lemons.

If you like to bring more natural beauty inside, try making the plant press on the next page.

For more ideas on nature-related crafts and activities to do with kids, see:

Advertisement

Make a Plant Press for Kids

A plant press is easy for kids to make and even easier to use. Afterwards, you will be able to preserve the memories from your nature walks.

What You'll Need:

  • 2 thin boards (about 8" x 10")
  • Saw
  • Corrugated cardboard
  • Utility knife
  • Newspaper
  • Scissors
  • Paper towels
  • Nylon webbing straps (one-inch wide)
  • 4 D-rings
  • Plants

To Make the Plant Press:

Step 1: Have an adult help you cut two thin boards to the size you want the press to be, about the size of a paper towel.

Advertisement

Step 2: Using the utility knife, cut sheets of sturdy corrugated cardboard the same size as your boards.

Step 3: Cut newspaper sheets twice the size of your paper towels and fold them in half.

Step 4: Lay down one board first, then a cardboard sheet, then two paper towels to act as a blotter, next a folded sheet of newspaper. Then add another sheet of cardboard and keep going in the same order. The last things to go on should be one last piece of cardboard, then the other board.

Step 5: Cut two straps of nylon long enough to go around the press twice.

Step 6: Slip the end of each strap through two D-rings, fold the end over, and sew in place.

To Press Plants:

Step 1: Lay them inside the folded newspapers and spread them out so they don't overlap. Arrange leaves and petals so that they lay flat.

Step 2: Build up your press as described above, using as many cardboard sheets and paper towel blotters as you need.

Step 3: Squeeze the layers together, strap the press tightly, and put it in a warm place for a week or more to dry.

Then you can use your pressed plants to make things like bookmarks or stationery.

For another fun nature project, try the do-it-yourself fossils project on the next page.

For more ideas on nature-related crafts and activities to do with kids, see:

Advertisement

Do-It-Yourself Fossils for Kids

Do-It-Yourself Fossils
Make some do-it-yourself fossils.
©2007 Publications International, Ltd.

Leave your mark on the world (or at least on plaster) when you create your own do-it-yourself "fossils" for kids.

What You'll Need:

  • Small natural object (shell, leaf, bone, etc.)
  • Petroleum jelly
  • Plaster of Paris
  • Water
  • Small disposable dish (such as a margarine tub)

Fossils are imprints of plants and animals found in rocks. Here is one way fossils are made in nature: A leaf falls into wet, sandy ground. A flood deposits more sandy soil on top of the leaf, so that it is trapped there. Over thousands of years, the leaf decays and disappears. But as the sandy soil hardens into rock, the impression made by the leaf is left in the rock. You can see how fossils are created by making your own.

Advertisement

Step 1: Choose an object to make a fossil of. It could be a shell, a leaf, an animal bone, or another object from nature.

Step 2: Coat the object with petroleum jelly.

Step 3: Next, pour some plaster of Paris and some water in a small dish. Mix them together well. Let the plaster of Paris and water sit for a few minutes, without stirring them.

Step 4: Press the object into the plaster of Paris and let everything dry. This will take at least one day.

Step 5: When the plaster of Paris is completely dry, remove the object. The impression left behind is like a fossil.

To make another practical gift out of natural objects, go to the next page to learn how to make fire-starting pine cones.

For more ideas on nature-related crafts and activities to do with kids, see:

Advertisement

Fire-Starting Pine Cones for Kids

Fire-Starting Pinecones
Make some fire-starting pine cones.
©2007 Publications International, Ltd.

Surprise someone with a fireplace with a basket of useful fire-starting pine cones. It's an educational activity for kids.

What You'll Need:

  • Small pine cones
  • Paraffin wax
  • Metal juice can
  • Pan
  • Water
  • Newspapers
  • Waxed paper
  • Scissors
  • Tongs
  • Salt
  • Basket or bucket
  • Ribbon

Step 1: Gather small pine cones outdoors. Clean off any dirt or leaves. If the cones are closed, put them in a warm oven for several hours until they dry out and open up.

Advertisement

Step 2: Break a block of paraffin wax into pieces and put them in a large metal juice can. Put the can in a pan of water and have an adult help you heat it slowly until the wax is melted. Never put a container of wax directly on a stove burner. It can overheat and catch fire.

Step 3: Spread newspapers on the surface you are going to work on.

Step 4: Cut some squares of waxed paper and lay them on the newspapers. Set the pan with the wax on the newspapers (the hot water will help to keep it melted).

Step 5: Pick up a pine cone in the tongs and dip it in the wax. Set the cone upright on the waxed paper.

Step 6: Sprinkle the cone with salt.

Step 7: Allow the cones to cool completely.

Continue with the rest of your cones. Pile them into a basket or bucket. Tie a ribbon into a big bow on the handle.

One or two of these cones is enough to start a fire in the fireplace. The salt makes them burn with a bright yellow flame.

To make a delicate, pretty gift for someone, see the seashell box on the next page.

For more ideas on nature-related crafts and activities to do with kids, see:

Advertisement

Seashell Box for Kids

Like an oyster shell holding a pearl, this seashell box for kids makes a wonderful hiding place for a small treasure.

What You'll Need:

  • Hinged seashell
  • Craft glue
  • Ribbon

Shells start out as homes to sea creatures. But once the creature is gone, shells can be homes for all kinds of interesting things. If you have both halves of a hinged seashell (they're called "bivalves"), you can make it into a small box for a prized possession.

Advertisement

Just glue a piece of ribbon or fabric to both inside halves of the shell, where they connect. The ribbon will act as a hinge so you can open and close the box. You can paint or decorate the shell -- or enjoy its natural beauty!

Now you can expand your creative view from a seashell to a whole habitat, and make a nature diorama. Learn how on the next page.

For more ideas on nature-related crafts and activities to do with kids, see:

Advertisement

Nature Diorama for Kids

Nature Diorama
Make a beautiful nature diorama.
©2007 Publications International, Ltd.

A diorama is a 3-D model of an area. Making a nature diorama is a good way for kids to learn about a part of nature -- and then demonstrate what you've learned.

What You'll Need:

  • Reference books
  • Shoe box
  • Markers or paint
  • Craft glue
  • Nature decorations
  • Clay
  • Cotton balls
  • Scissors

The world is made up of many different types of habitats or environments. To create your diorama, you'll first need to learn about one kind of habitat. You might pick the desert, woods, or someplace else. Learn about the plants and animals that live there, the different kinds of rocks and water sources, and anything else that makes that habitat unique.

Advertisement

Once you have a picture in your mind of what the area is like, turn that picture into your diorama.

Step 1: Turn the shoe box on its side.

Step 2: On the sides and "roof" of the box, draw or paint the background of your habitat.

Step 3: Use what is the "floor" of the shoe box to make the foreground of your diorama. You might glue down sand and rocks for a desert, or toy trees and a "lake" (shallow cup of water) for a woods.

Step 4: Make plants and animals out of clay to populate your habitat.

Step 5: Glue cotton balls to the top of the box in order to put clouds in the sky.

Did you know you can make works of art with grass? Check out the next page to learn how to make grass prints.

For more ideas on nature-related crafts and activities to do with kids, see:

Advertisement

Grass Prints for Kids

The same kind of grass you see out on your lawn can be used to make beautiful artwork. Learn how to make grass prints for kids, below.

What You'll Need:

  • Grasses of various kinds (include seed heads)
  • Paper
  • Wax paper
  • Water-based paints
  • Paintbrush
  • Cloth (optional)

Step 1: Lay your grasses out on a table and choose those you like the best.

Advertisement

Step 2: Arrange the grasses you like on paper. Try making interesting contrasts between lacy seed heads and thick grass blades.

Step 3: Lay the grass on wax paper.

Step 4: Load a brush with paint and dab the paint on the grass until it is thinly but fully coated on one side.

Step 5: Lift the painted grass from the wax paper and lay it, paint side down, on the paper you want to print.

Step 6: Lay another sheet of wax paper on top and press gently so that the grass makes good contact with the paper.

Step 7: Remove the wax paper and grass.

Watercolor paint works on white paper, while tempera looks nice on colored paper. Use fabric paint on cloth to make beautiful grass-printed T-shirts and bandannas!

Everyone wants to take the beach home with them when the summer's over. Well, with the craft on the next page, you can do just that.

For more ideas on nature-related crafts and activities to do with kids, see:

Advertisement

Beach in a Bottle for Kids

Beach in a Bottle
Make a beach in a bottle.
©2007 Publications International, Ltd.

This simple craft can have an enormous calming effect. On this page, you will learn how to make a beach in a bottle for kids.

What You'll Need:

  • Clear plastic jar with lid
  • Sand
  • Seashells
  • Feather
  • Other beach trivia

Ever longed for the ocean with none in sight? This beach in a bottle will help "tide" you over between trips.

Advertisement

Step 1: Find a clean, clear plastic jar with a secure lid (a soap-and-water-washed peanut butter jar works well).

Step 2: The next time you hit the beach, gather up half a jar of clean, garbage-free sand.

Step 3: Walk the waterline to see what treasures you can find. Are there shells washed up from the ocean floor? A feather from a seabird? A beautiful piece of driftwood? A finely polished piece of beach glass? Drop them in the jar along with the sand.

Step 4: Now securely close the jar and take it home.

That bottle of beach will remind you of what you love about the shore and why you want to go back soon.

Another way to preserve memories of nature is with plaster. Learn how to make a plaster forever fish on the next page.

For more ideas on nature-related crafts and activities to do with kids, see:

Advertisement

Plaster Forever Fish for Kids

Plaster Forever Fish
Make a plaster forever fish.
©2007 Publications International, Ltd.

No one will question your bragging if you make a plaster forever fish for kids, preserving your prize fish forever.

What You'll Need:

  • Fish
  • Modeling clay
  • Plaster of Paris
  • Mixing container for plaster
  • Spoon
  • Acrylic paints
  • Paintbrush
  • Spray acrylic
  • Adult help
  • Hot glue or cement (optional)

You may catch a fish so big that you'd love to see it preserved and mounted on the wall so you can show it off to your friends. With some plaster and clay, you can!

Step 1: Clean your fish and leave the head on. Lay it out flat in a pan. Set it in a freezer overnight and let it freeze. The next day, remove the fish from the freezer.

Step 2: Roll out a slab of modeling clay a little bigger and a little thicker than your fish. Press the fish firmly into the clay. Gently pull it out and see if you like the mold you've made. If there are air bubbles or imperfections, knead the clay, roll it out, and try again.

Step 3: When you've got a mold you like, put the fish back in the freezer. Mix some plaster in a container until it is about as thick as heavy cream. Pour the plaster slowly into the mold. Try to avoid making air bubbles.

Step 4: Let the plaster dry several hours, then remove it from the mold. Let the plaster dry completely overnight before attempting to remove any clinging bits of modeling clay.

Step 5: Once your plaster fish dries, decorate it with acrylic paints. Use the frozen fish as a color model to ensure that your plaster fish looks as real as possible.

Step 6: After the paint dries, spray it with clear acrylic coating.

Step 7: If you like, use hot glue (with adult help) or contact cement to mount your plaster fish to a wall plaque.

On the next page, you will learn how to use dried flowers and beveled glass to make a stained glass ornament.

For more ideas on nature-related crafts and activities to do with kids, see:

Sparkling Stained Glass

Sparkling Stained Glass
Make a sparkling stained glass ornament.
©2007 Publications International, Ltd.

Delicate pressed flowers sparkle like crystals in these delightful sun catchers. They are called sparkling stained glass for kids, but you can make them easily with glass bevels and colored tape.

What You'll Need:

  • 2 glass bevels, 4 inches square each
  • Pressed flowers
  • Colored duct tape or electrician's tape
  • Ribbon to match flower colors
  • Paper towels
  • Tacky glue
  • Toothpick
  • Paper clip
  • Scissors
  • Hot glue gun and glue sticks (optional)

Step 1: Wipe the glass bevels perfectly clean of dust or fingerprints, and place one on your work table, flat side up.

Step 2: Place pressed flowers on the glass, making a pretty design with one point of the square as the top of your picture.

Step 3: Stick the flowers in place with tiny dots of white glue applied with a toothpick. Let glue dry overnight.

Sparkling Stained Glass, Gluing on the Flowers
Glue the flowers onto the beveled glass.
©2007 Publications International, Ltd.

Step 4: Cut 4 strips of tape, 1/2 inch wide and about an inch longer than the sides of your glass.

Step 5: Straighten the paper clip out, then bend it to make a loop in the center with the 2 ends forming the points of a triangle.

Step 6: Wrap tape around the 2 bottom sides of the bevels, securing them together. Take care to make your tape smooth and straight.

Step 7: Hold the bent paper clip in place at the top point, with the wire ends laying along the bevel sides. Tape over these wires as you secure the top sides together. (If the glass is very heavy, use a glue gun to glue the paper clip to the glass before taping it in place.)

Step 8: Neatly trim the tape at the corners.

Step 9: Tie a ribbon onto the loop and hang your beautiful crystal in a sunny window.

See the next page for instructions on making another decorative nature craft project -- elves and hedgehogs!

For more ideas on nature-related crafts and activities to do with kids, see:

Fun-Loving Forest Elves for Kids

Fun-Loving Forest Elves
Make some fun-loving forest elves.
©2007 Publications International, Ltd.

These playful little critters -- fun-loving forest elves for kids -- can help liven up your Christmas decorations or just add a touch of whimsy to your child's room.

What You'll Need:

  • Large bark pieces (or landscaping bark chunks), clean and dry
  • Decorative brass tacks
  • Toothpicks
  • White air-dry clay
  • Brown acrylic paint
  • Colored felt scraps
  • Pom-poms
  • Wiggle eyes
  • Work gloves
  • Dry teasels (prickly weeds you can find in fall)
  • Black beads
  • Scissors
  • Cool-temp glue gun and glue sticks
  • Paintbrush
  • Tacky glue

Have an adult help you when using a glue gun!

To Make an Elf:

Step 1: Select a chunk of bark for the body. Poke 2 holes in the bottom with a brass tack. Stick a toothpick into each hole, then cut the toothpick with the scissors so that 1/4 inch sticks out. Using the glue gun, glue toothpicks into holes.

Step 2: Shape 2 almond-sized lumps of clay into flattened feet shapes. With the scissors, snip 4 shallow cuts in the end of each, then trim to create toes.

Step 3: Place the clay feet together and gently push the bark body down on top so the toothpick ends poke into the clay and the figure stands up. Set the figure aside so the clay will harden overnight.

Fun-Loving Forest Elves, Adding the Feet
Push the toothpicks into the clay feet.
©2007 Publications International, Ltd.

Step 4: The next day, gently pull the toothpicks out of the clay and paint the feet brown. When paint is dry, use glue gun to apply glue to the toothpick ends and then set the body on the feet again permanently.

Step 5: Cut out a felt hat and belt (a strip of felt long enough to overlap around middle of bark) for the figure. Shape the hat into a cone and, using tacky glue, glue into shape. Glue pom to the top of the hat. Glue hat to the top of the elf's head and the belt around his middle.

Step 6: Poke the brass tack through the belt and into the bark, making a shiny belt buckle.

Fun-Loving Forest Elves, Decorating with Beads
Glue wiggly eyes on and add other facial features to your elf.
©2007 Publications International, Ltd.

Step 7: Use tacky glue to glue on wiggle eyes. Other accessories can be added if you wish, such as a twig staff beside the body, a fur mustache, yarn hair, or a tiny pom nose.

To Make a Hedgehog:

When you are trimming the hedgehog, wear work gloves to protect your fingers.

Step 1: Use scissors to cut stem off the teasel. Cut the dry leaves short so they look like whiskers, and trim the stickers flat on one side of the teasel.

Step 2: Shape 4 feet from a piece of clay and stick the teasel on top of them. After the clay dries overnight, lift the teasel off the feet and paint the feet brown.

Step 3: When paint is dry, use glue gun to apply glue to the feet and set the teasel back in place on the glue.

Step 4: Glue on 2 wiggle eyes and 1 black bead nose to create the face.

For more ideas on nature-related crafts and activities to do with kids, see:

Advertisement

Loading...