How to Draw in Perspective

Your drawings of buildings will look m­ore realistic if you use perspective. This is a w­ay of drawing an object so that the drawing shows depth. A far-away object appea­rs smaller than a close-up object, even if they are actually the same size. A drawing made in perspective will show the two objects in their correct relative sizes.

It's easy to draw both near and far objects the correct size if you use vanishing points. If you look down a pair of railroad tracks, you can see that in the distance they appear to come together. The point at which lines that are actually parallel appear to come together is called the vanishing point.

Advertisement

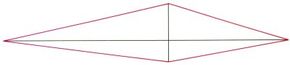
Drawing a building requires two vanishing points -- one on each side of the building. These two points represent the point where the horizontal lines of the building would come together if they were long enough.

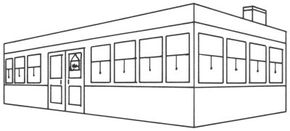
In this section, we'll show you how to use perspective in your drawings. You can draw the building below freehand while looking at your computer monitor, or you can print out this page to get a closer look at each step.

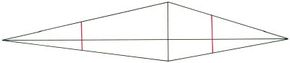
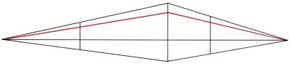
Here, we'll show you an illustration of each step and then give you a description of how to draw it. Follow the red lines in each illustration to learn exactly what to draw in that step. The lines drawn in previous steps are shown in gray.

Advertisement

1. Draw Two Lines

To use perspective when drawing a simple building, draw a straight line across your paper. The line will represent the horizon, and points at either end of your line will be­ your vanishing points.

Then draw a vertical line extending through the horizontal line to show the front corner of your building. The front corner will be the tallest edge because it is closest to you.

Advertisement

2. Connect the Points

If you draw a straight line connecting the top of this vertical line with the left-hand vanishing point, and then draw another straight line connecting the top of the vertical line with the right-hand vanishing point, those two lines show the proper angle for the roof line.

Connect the bottom of the vertical line with both ends of the horizontal line. Now you have drawn the proper angle for the bottom of the building.

Advertisement

3. Draw the Sides

Between these diagonal lines, draw another vertical line about halfway on either side of the center line. These are the left- and right-hand sides of the building.

Advertisement

4. Draw a Roof Line

To draw something parallel to the roof line of the house -- the tops of windows, for example -- draw a line from the front corner of the building to each of the two vanishing points. This shows the correct angle for other lines parallel to the top and bottom of the building.

Advertisement

5. Finish the Building

Finish the building by adding windows, a door, and a chimney. Erase unnecessary pencil marks. Now you have a realistic-looking structure that you can build on!

Your drawing is finished! Even if you don't get perspective right the first time, keep practicing until you're happy with your drawing.

Advertisement

A lighthouse helps guide ships home. Learn how to draw a lighthouse in just four steps in the next section.

Advertisement

Loading...