How to Draw Bullet Trains in 6 Steps

Bullet trains are the fastest trains around, zooming down the tracks at high speeds.
Publications International, Ltd.

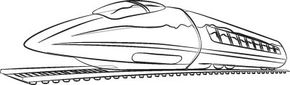
Bullet trains are the latest and greatest way to travel the railways at top speed. Use these step-by-step instructions to draw your own rapid transit.

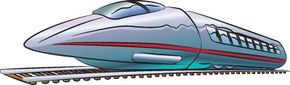
In this article, we'll show you how to draw the above bullet train. Either draw it freehand while looking at your ­computer monitor or print out this page to get a closer look at each step.

Advertisement

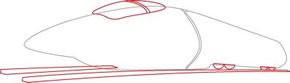
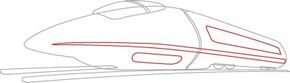
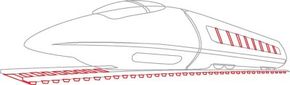
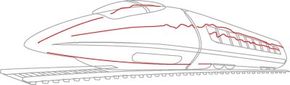
Follow the red lines in each illustration to learn exactly what to draw in that step. The lines drawn in previous steps are shown in gray. Here, we'll show you an illustration of each step and then give you a description of how to draw it.

­

Advertisement

1. Draw the Body

Draw a long, rounded shape like a banana to form the train body. Add two curved lines to split the engine section from the passenger car.

In the next step, we'll work on drawing the rails.

Advertisement

2. Add the Rails

­

­Draw two long, thin rectangles to make the rails (draw the longer one first and then match the perspective of the shorter rectangle to it). Sketch four half-circles at the back of the train for wheels. Add a rounded window shape at the top of the engine. Draw two curved lines to split the window.

On the next page, we'll begin work on the windows.

Advertisement

3. Draw the Windows

­

­Draw a very skinny, long triangle across the side of the train. Add a rounded rectangle to the passenger section for a window. Sketch a long oval hatch on the bottom of the engine section.

On the next page, we'll continue work on the windows and add railroad ties.

Advertisement

4. Draw Railroad Ties

Draw several small, thin rectangles to split the passenger window. Sketch several rectangles between the rails to make the railroad ties. Finish them with small wedge shapes under the first rail.

We'll work on adding detail to the body on the next page.

Advertisement

5. Add Reflections to the Body

­

­Draw a few curvy and straight lines following the shape of the train. These make reflections on the shiny metal surface of the train.

We're almost done! We'll add the final touches on the next page.

Advertisement

6. Add the Final Touches

­

­Trace the pencil lines you want to keep with a felt-tip pen. Erase any extra lines.

If you have more cargo to haul on your imaginary railway, our next project is for you. Continue to the next article to learn how to draw flatcars.

Advertisement

See all How to Draw articles.

Advertisement

Loading...