Woven bracelets are just one of thepieces of jewelry you can learn to make.
Whether it's to celebrate a special occasion or an ordinary day, handmade bracelets are a perfect complement to any outfit. All you need are a few materials to get you started and some endless creativity.
Bracelets made by your are also a perfect gift to give to your friends and family, and it will show them just how much you care. Even if you've never attempted to design jewelry, you'll find that you don't need to be a professional to make kids' bracelets.
Advertisement
Follow the links below to learn how to make kids' bracelets:
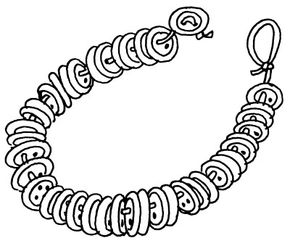
String together an assortment of colorful buttons to make an original button bonanza bracelet.
What You'll Need:
Crazy-color buttons with large holes (try a grab bag from the fabric or craft store)
Advertisement
Leather cords or shoelaces
Scissors
How to Make a Button Bonanza Bracelet:
Make sure you have enough buttons and cords or shoelaces to make a bracelet of the desired length. Tie a knot at the end of the leather cord or shoelace. With the first button face up, thread the cord up through one hole and down through the other. Tie a knot after it.
Add more buttons in alternating colors and sizes. They can be placed next to each other or spaced apart with knots in between. If your buttons have four holes instead of two, use double laces. At the end of the cord, make a loop large enough to fit over the first button and tie it off.
Keep reading to learn how to add a part of the outdoors to your jewelry collection.
For more creative kids crafts and activities, check out:
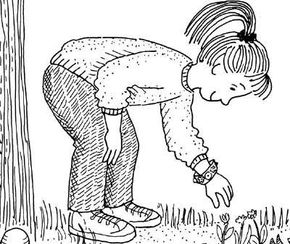
Incorporate part of the outdoors into your jewelry collection with this nature-made bracelet. Take a walk and make a bracelet at the same time.
What You'll Need:
Roll of wide masking tape
Advertisement
Nature
How to Make a Nature-Made Bracelet:
Take a walk on a nice sunny day. Ask a grown-up to walk with you out in the woods or in a field where there are lots of little natural "gems" (such as baby pine cones, leaves, little pebbles, seed pods, and moss) to collect for your bracelet.
Before leaving on your walk, have the grown-up attach a loop of wide masking tape, sticky side out, around your wrist. As you walk, pick up pretty bits of nature and stick them onto the tape. Make a bracelet of tiny wild flowers and acorn tops or small feathers and fuzzy grass.
Keep reading to learn how to charm your friends with a fancy bracelet.
For more creative kids crafts and activities, check out:
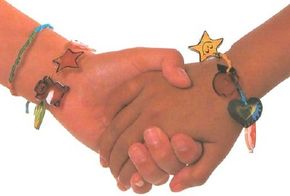
Do you "knot" know what to get your friends as a gift? Give them a charming friendship bracelet made by knotting thread.
What You'll Need:
4 colors of embroidery floss, 2-1/2 feet each
Advertisement
Deli containers with the 6 recycling symbol (or shrink plastic)
Permanent marker pens
Gold metallic elastic thread
Tape
Scissors
Pencil
Hole punch
Aluminum foil
Oven
How to Make a Charming Friendship Bracelet:
Step 1: Tie the four different colors of embroidery floss together. Tape the knotted end to a table top.
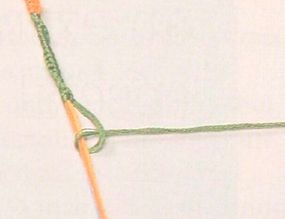
Step 2: Select a color of floss to begin. Make a loop with the floss and bring the end through the loop.
Pulling the loops tightly will create a spiral.
Step 3: Pull the strand tightly to make a knot. Repeat this knot until you have covered about one inch, pulling the knots up tightly as you go. The knots will naturally spiral around the inner threads. If you'd like, add charms to your bracelet.
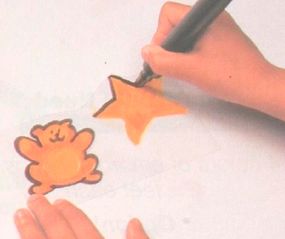
Use a marker to add detail to the stencils.
Step 4: To make charms: Download the Stencil Instructions as a PDF. Place clean, flat pieces of plastic over the patterns, and trace with a pencil. Using markers, color the backgrounds, then add details and outline. You can also draw designs of your own, making them about the same size as the pattern shapes.
Step 5: Cut out the plastic shapes. Punch a hole in each one, not too close to the edge.
Step 6: Ask an adult to help with this step. Lay plastic shapes on aluminum foil and bake in an oven set at 300 degrees Fahrenheit for one to two minutes. The plastic will curl and shrink, then gradually flatten. Remove the charms from the oven when they're almost flat.
Step 7: Cool charms completely, then string them onto your woven bracelet or onto elastic thread, making a knot to tie each charm about 1/2 inch from the others. Cut the thread after seven or eight charms and knot the ends securely.
Keep reading to learn how to weave lanyard into a colorful bracelet.
For more creative kids crafts and activities, check out:
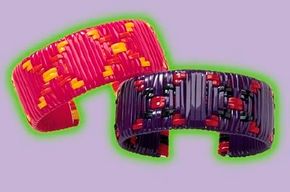
Wrap and bend lanyard laces toshowcase designs on your woven bracelets.
You can create a terrific design for a woven bracelet by simply wrapping and weaving lanyard laces. After you've finished making your bracelet, you can bend it to fit your wrist.
Low-temperature glue gun and glue (adult help needed)
How to Make a Woven Bracelet:
Step 1: Smooth the edges and corners of the bracelet blank with the fingernail file.
Step 2: Cut six 10-inch pieces of yellow lace. Cut four 10-inch pieces of black lace. Position laces side by side on a piece of tape as follows: two yellow, two black, two yellow, two black, two yellow.
Step 3: Center the bracelet blank on top of the laces. Fold one end of laces over to the back of the bracelet blank. Tape the lace ends to the back of the bracelet blank.
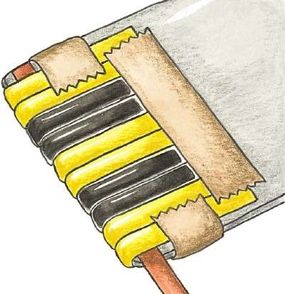
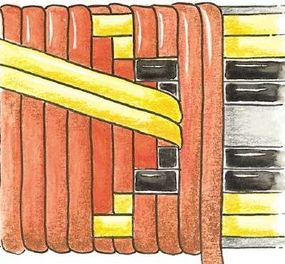
Insert one end of the red lanyardunder the yellow and black laces.
Step 4: Insert one end of the red lace under the yellow and black laces on the back of the bracelet blank. Glue the end to hold.
Step 5: Tightly wrap the red lace around the bracelet blank seven times, making sure the lanyard touches the one beside it, covering the yellow and black laces on front and back. Keep the laces flat.
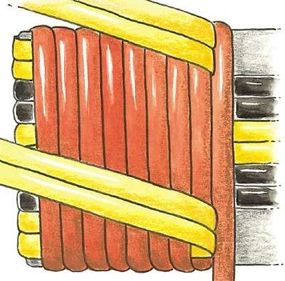
After tightly wrapping the red laces,
Step 6: Lift the outside yellow laces. Wrap the red lace once. Keep the red lace wrapped as close to the last one as possible.
Step 7: Keeping the outside yellow laces up, lift the next yellow laces. Wrap the red lace once. Pull all laces tight.
Step 8: Lay the yellow laces back down. Lift the outside black laces, and wrap the red lace once.
Step 9: Keeping the outside black laces up, lift the next black laces. Wrap the red lace once.
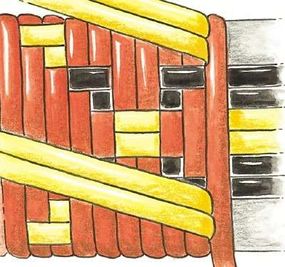
Lift the center yellow laces tocontinue weaving your lanyard.
Step 10: Lay the black laces back down. Lift the two center yellow laces, and wrap the red lace twice.
Step 11: Lay the yellow laces back down. Lift all the black laces, and wrap the red lace once.
Step 12: Lay the inside black laces back down, and wrap the red lace once.
After wrapping the red lace aroundthe black, lift all the yellow laces.
Step 13: Lay the black laces back down. Lift the two outside yellow laces on both sides, and wrap the red lace once.
Step 14: Lay the inside yellow laces on each side back down, and wrap the red lace once.
Step 15: Lay the outside yellow laces back down. Wrap the red lace four times. Pull all laces tight.
Step 16: Repeat steps 6 through 15 three more times, omitting step 15 the last time. Pull the yellow and black laces tight, and keep the red lace as close to the lace beside it as possible.
Step 17: After the last repeat of the design, fold the yellow and black laces over to the back of the bracelet blank. Trim the laces to one inch and tape down. Wrap the red lace around the bracelet blank seven times following the same wrapping technique as in step 5.
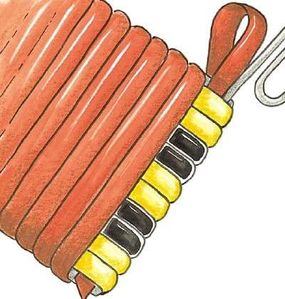
Insert a bent paper clip to help youfinish off your woven bracelet.
Step 18: Unbend one end of the paper clip. With the straightened end, slightly loosen the yellow and black laces at the end of the bracelet blank back. Trim the red lace end at an angle. Insert the end under the yellow and black laces.
Step 19: Remove the paper clip, and pull the red lace tight. Glue the lace end to hold. Trim the end.
Now that you've mastered weaving, keep reading to learn how to make another handmade bracelet.
For more creative kids crafts and activities, check out:
Make Rakhi (Hindu plaited bracelets) to hand out to your friends and family. Traditionally, Rakhi are given to family members at Raksha Bandhan, a festival celebrated by most Hindu and Sikh families.
What You'll Need:
Strips of fabric, yarn, string, or ribbon
Advertisement
Piece of corkboard or cardboard
Pins
Small circle of cardboard
Aluminum foil
Sequins
Craft glue
Markers
Needle and thread
How to Make Hindu Plaited Bracelets:
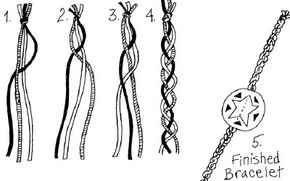
Use strips of fabric or pieces of string that are more than double the length of the bracelet you want. To make a three-strand rakhi, knot the ends of three pieces of ribbon or fabric together. Pin the ribbon or fabric to a corkboard or piece of heavy cardboard so it is easier to work with.
Braid the ribbons or fabric pieces as shown in the diagram. Continue braiding in this manner until you have braided almost all of the length of ribbon or fabric. To finish the plait, knot the ends of the ribbon or fabric together.
Decorate a small circle of cardboard with foil, sequins, and markers. Sew the decorated circle to the middle of the plaited band. To wear the plait as a bracelet, tie it around your wrist.