How to Make Girls' Hair Barrettes

A gathered rosette is one of many types of hair barrettes you can make.

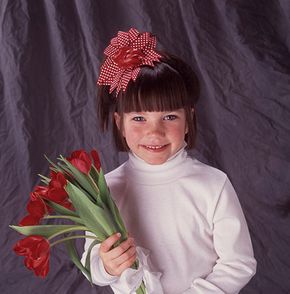
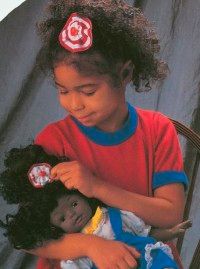
When Mom (or maybe Grandma) was a girl, barrettes were worn primarily to pull back her hair away from her face. Today, though, barrettes have become as much a fashion accessory as a tool for keeping hair out of your eyes.

You've probably seen a variety of decorative hair barrettes at department stores or specialty boutiques. Barrettes can look pretty or whimsical or glitzy -- it all depends on the materials used. But you don't have to buy your hair accessories; you can make barrettes yourself. It's a fun craft that lets you make your own fashion statement.

Advertisement

Looped Barrette

Colorful ribbon and crayons make a looped barrette special. Learn how to create one.

Gathered Rosette

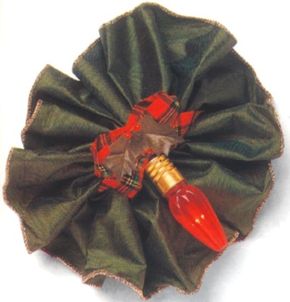
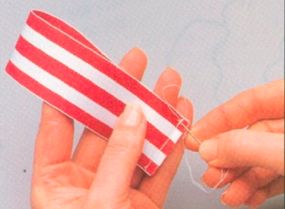
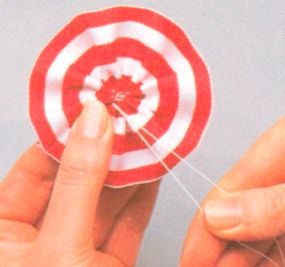
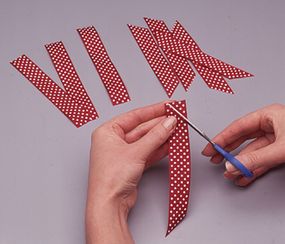
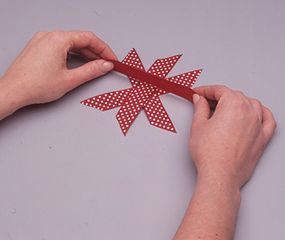
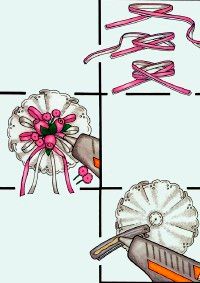
Make a gathered rosette barrette with ribbon and a few simple stitches.

Balloon Barrette

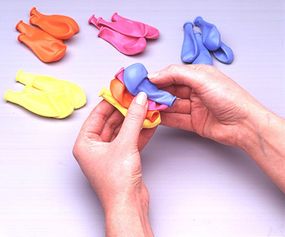
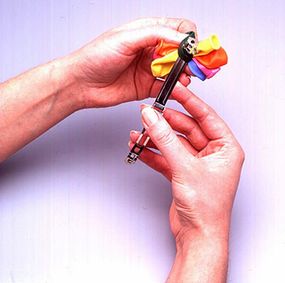
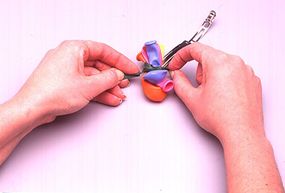
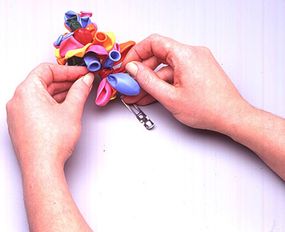
A balloon barrette is quick and easy to assemble -- and it's perfect for parties. Try to make one using these easy instructions.

Barrette Topper

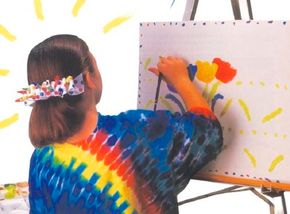
Barrette toppers let you get creative. You can put anything on the topper, from paint to candy. Find out more.

Pinwheel

What could be cuter? Check out the smoochy red lips attached to this pinwheel barrette.

Lace-n-Flowers Barrette

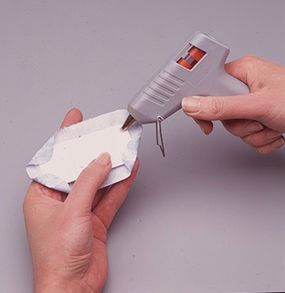
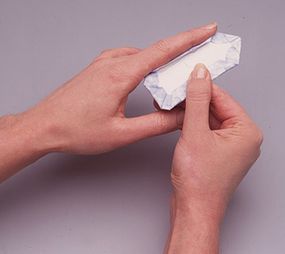
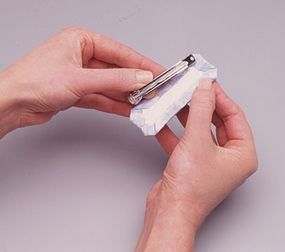
Just right for a special occasion -- here's a pretty barrette that uses eyelet lace and silk rosebuds. See how to create it here.

A looped barrette looks great, and it's fun to create. Keep reading to find out how to make a looped barrette that uses crayons as decoration.

For more fun crafts and activities, check out:

Advertisement

Looped Barrette

Create a looped barrette with ribbon and crayons.

A looped barrette is a fun fashion accessory, especially when you make it with colorful ribbon and crayons -- yes, crayons! It's perfect for the artist in you.

You also can create a looped barrette with other novelties in place of the crayons -- just glue your favorite item between the loops. For example, use jingle bells for a holiday barrette, or use tiny hearts for a Valentine's Day barrette. Any way you do it, it'll be a masterpiece.

Advertisement

What You'll Need:

  • 3-3/4" barrette
  • Craft wire
  • 1-1/3 yards ribbon, 1-1/2" wide
  • 6 crayons
  • Scissors
  • Wire snippers
  • Glue gun

How to Make a Looped Barrette:

Step 1: Open the barrette and remove the spring by pulling at the center. Set the spring aside. Slip craft wire through the hole in the end of the barrette and twist to secure. Wrap wire around the barrette several times.

Step 2: Pinch the ribbon approximately 3" from end. Place on the barrette at the wired end, and wrap the wire around the ribbon and barrette several times to secure.

Step 3: Pull up about 3" of ribbon and make a loop about 1-1/2" tall. Pinch ribbon, and wrap the wire around the ribbon and barrette several times to secure.

Step 4: Continue making loops and securing them to the barrette with wire. You should be able to make approximately 12 loops and still have enough to leave a 3-inch tail of ribbon at the end of the barrette.

Step 5: Slip wire through the hole at the end of the barrette and twist to secure. Trim wire end. Trim ribbon ends evenly and at a 45 degree angle. Replace the spring in the barrette.

Step 6: Cut crayons in half and glue the cut end to the barrette at random between loops of ribbon.

A gathered rosette is created with ribbon and a few simple stitches. Keep reading to find out about this easy-to-make barrette.

For more fun crafts and activities, check out:

Advertisement

Gathered Rosette

This rosette makes a perfect holiday barrette.

A gathered rosette is quick and easy to make, and you can make one in almost any size. Get some ribbon, and then use silk flowers, buttons, or appliqués for the finishing touch.

A gathered rosette makes such a pretty barrette, you might want to make a matching one for a favorite doll -- just glue a small rosette on a hook-and-loop fastener instead of on a barrette.

Advertisement

The large rosette below was made with a silky, gilded material. The flashing holiday ornament at the center gives it a festive look.

For a more elegant look, make rosettes with a fine white lace and top with a silk flower. The instructions for the gathered rosette on this page use a heart at the center for a sweet touch.

What You'll Need:

  • 10-inch ribbon, 1-1/2" wide
  • 7-inch ribbon, 7/8" wide
  • 2-1/2" metal barrette
  • Heart button
  • Scissors
  • Glue gun

How to Make a Gathered Rosette:

Step 1: With right sides together, match the ends of the 1-1/2" wide ribbon and sew a seam 1/4" from the edge to form a loop. Trim thread tails.

Step 1. Sew the ribbon to form a loop.

Step 2: Turn ribbon right side out, so the seam is inside the loop. Sew a row of running stitches along one long edge of ribbon beginning and ending at the seam. Do not cut thread tails.

Step 3: Pull both thread tails of running stitches to gather ribbon and form a rosette. Tie thread tails into several knots to secure rosette. Trim excess thread.

Step 3. Create a rosette with the ribbon.

Step 4: Using the same technique, create a small rosette with the 7/8" wide ribbon.

Step 5: Glue large rosette to barrette, glue small rosette to large rosette, and glue heart button to small rosette. Allow to dry.

A balloon barrette is great for parties or every day. Best of all, it's quick and easy to make. Keep reading to find out how.

For more fun crafts and activities, check out:

Advertisement

Balloon Barrette

balloon hair barrette
You don't need to dress like a clown to wear this cute balloon barrette.
n

A balloon barrette is sure to be a favorite for years to come. The colors are a vibrant, visual treat, and the balloons certainly create a festive mood. And best of all, it's so easy to make -- just balloons and a barrette -- you might want to make a collection of them.

It's a perfect barrette to wear to a party -- in fact, it makes a great party favor, too -- but it looks so great, you'll also want to wear it every day, even when you're just "clowning around."

Advertisement

What You'll Need:

  • 25 small balloons, various colors
  • 2-3/4 inch barrette

How to Make a Balloon Barrette:

how to make a balloon barrette
Alternate the direction of the balloons.
n

Step 1: Take four balloons of different colors and group them together, alternating their direction.

how to make a balloon barrette
Wrap a fifth balloon around the group of balloons.
n

Step 2: Open the barrette clip and remove spring by pulling at center. Place the group of balloons on top of the barrette and wrap a fifth balloon around them at a slight angle.

barrette with balloons
Tie a knot in that fifth balloon.
n

Step 3: Tie a knot in the fifth balloon to secure the group to the barrette.

colorful balloon barrette
Continue adding balloons in the manner described below.
n

Step 4: Continue adding groups of balloons along the length of the barrette in this way. Five groupings should be enough to cover the barrette. Adjust the balloons as needed for a balanced look. Replace the spring in the barrette.

A barrette topper gives you a "platform" to create any number of designs for a hair accessory. Find out more about it on the next page.

For more fun crafts and activities, check out:

Advertisement

Barrette Topper

barrette topper
Barrette toppers give you the platform to create a variety of different barrettes.
n

Barrette toppers make a nice, broad platform for most anything you want to put on them -- candy, painted squiggles, drawings, sequins, beads, charms, or just a fabric with an interesting pattern. Try using alternating colors of paint to create a pattern that looks complex.

Do you like fish? How about unicorns? Are you more of a bird person? Glue some on! Your barrette topper lets you go wild -- or keep it mild. Make yourself a pair of toppers and use them to pull your hair back at the sides.

Advertisement

What You'll Need:

  • Medium-weight non-stretch fabric, 2-3/8" × 4-1/4"
  • Lightweight quilt batting, 1-3/8" × 3-1/4"
  • Lightweight cardboard, 1-3/8" × 3-1/4"
  • 2-3/4" barrette
  • Glue gun
  • Scissors

How to Make a Barrette Topper:

how to make a barrette topper
Trim your materials so they have rounded edges.
b

Step 1: Trim the corners of the fabric, batting, and cardboard to make them rounded.

creative barrettes
Glue the batting and cardboard together.
n

Step 2: Glue the batting on top of the cardboard.

plain hair barrette
Glue the batting and cardboard to the fabric.
n

Step 3: Lay the cardboard and batting on top of the fabric, making sure they are centered; the cardboard and the wrong side of the fabric should be facing you. Apply a drop of glue to each corner of the cardboard and fold each corner of the fabric over so that they are glued together.

simple hair barrette
Fold over the four edges and glue them down.
n

Step 4: Apply glue to the four edges of the cardboard and fold the four edges of the fabric over so that they are glued together.

hair barrette
Glue the barrette to the cardboard.
n

Step 5: Glue the top of the barrette to center of the cardboard.

A little ribbon, a little glue -- you might be surprised at how glamorous a barrette you can make with these simple items. Find out how on the next page.

For more fun crafts and activities, check out:

Advertisement

Pinwheel Barrette

girls barrettes
A pinwheel barrette is just right for special occasions.
n

Fresh and fun with a hint of glamor, a pinwheel barrette is just right for those occasions when you want to wear something extra special.

Glitzy, bright, lavish -- it's all that. And the smoochy red lips added as a finishing touch make your pinwheel barrette memorable.

Advertisement

What You'll Need:

  • 1-1/3 yards ribbon, 7/8" wide
  • 3 novelty lips
  • 2-3/4" barrette
  • Scissors
  • Glue gun

Simple yet fancy, this pinwheel uses an interesting technique. The ribbons are twisted once at the center before being glued together. This works best with thin, delicate ribbon material, such as satin.

How to Make a Pinwheel Barrette:

how to make a pinwheel barrette
Cut eight pieces of ribbon.
h

Step 1: Cut the ribbon into eight 6" pieces. Trim the edges of each piece at an angle.

pinwheel barrette
Glue the ribbons together at the center.
n

Step 2: Place a drop of glue on the center of one piece of ribbon and glue another piece of ribbon across it. Glue on each of the remaining six pieces to form a circle.

girls hair barrettes
Glue the lips to the pinwheel.
n

Step 3: Glue the lips to the center of the pinwheel.

pinwheel hair barrette
Glue the pinwheel to the barrette.
n

Step 4: Glue the pinwheel to the top of the barrette.

It's fun to get dressed up for special occasions; now you can dress up your hair, too. Keep reading to find out how to make an extra-pretty Lace-n-Flowers barrette.

For more fun crafts and activities, check out:

Advertisement

Lace-n-Flowers Barrette

The Lace-n-Flowers barrette will dress up any outfit.

With a Lace-n-Flowers barrette in your hair, you can't help but feel special. It's a pretty barrette to wear for a party or holiday event, but it will dress up any outfit, whether you're wearing a fancy dress or school clothes.

You can make it from eyelet lace, satin ribbons, and tiny silk rosebuds -- and a little help from Mom. You'll feel like a princess whenever you wear your Lace-n-Flowers barrette.

Advertisement

What You'll Need:

  • White thread
  • Sewing needle
  • 14" length of 2-inch-wide white eyelet lace
  • 1/4-inch-wide satin ribbon: 27" length white, 27" length pink
  • 2" white slim chenille stem
  • 3 pink silk rosebuds, 1" each
  • 6 pink silk flowers, 3/4" each
  • 2-3/4" barrette
  • Glue gun
  • Scissors
Set the glue gun on low heat.

How to Make a Lace-n-Flowers Barrette:

Step 1: Thread needle and knot ends of thread. Stitch 1/2-inch-long basting stitches through binding edge of eyelet lace. Pull thread tightly to form circle of eyelet lace and knot. Cut thread. Slightly overlap ends of lace and glue together (use glue gun on low).

Step

2: Match pink and white ribbon ends together. Form a bow with four loops (double bow), then wrap the chenille stem around the center of the bow; twist ends together at back. Fold over twisted ends. Glue center of bow to center of eyelet lace circle.

Step 3: Apply glue to bottom of three rosebuds and place in the center of the ribbon bow in a triangle. Glue three groups of two small flowers between rosebuds.

Step 4: Apply a line of glue to top of barrette and place back of eyelet lace circle onto barrette.

For more fun crafts and activities, check out:

ABOUT THE CRAFT DESIGNERS

Looped Barrette by Janis Bullis, Mary Beth Janssen-Fleischman

Gathered Rosette by Janis Bullis, Mary Beth Janssen-Fleischman

Balloon Barrette by Janis Bullis, Mary Beth Janssen-Fleischman

Barrette Topper by Janis Bullis, Mary Beth Janssen-Fleischman

Pinwheel Barrette by Janis Bullis, Mary Beth Janssen-Fleischman

Lace-n-Flowers Barrette by Cindy Groom Harry and Staff

Advertisement

Advertisement

Loading...