How to Slim a Tie
Old super-wide ties are decidedly outdated, but they can be saved. To give an old tie new style, remodel it to the standard width.
Tools: scissors, seam ripper, sewing needle, tailors' chalk or pencil, straightedge, steam iron and ironing board.
Advertisement
Materials: thread.
Time: about 1 hour.
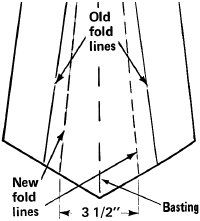
The standard width for neckties is currently 3 1/2 inches at the wide end; to be in style, a tie shouldn't vary from this standard more than 1/2 inch either way. To narrow a super-wide tie, recut it to the standard width.
First remove the label on the back of the tie. Carefully open the seam at the wide end of the tie to about half the length of the tie. Spread the tie open on a flat surface.
Inside the tie, a piece of lining is attached to each end; the wide end is lined for about 6 to 8 inches and the short end for about 4 inches. Inside the lining is a separate interlining that runs almost the entire length of the tie. All three layers of the tie must be adjusted.
Thread a needle with a contrasting thread and make large basting stitches down the center of the tie to hold the interlining in place temporarily. Turn the tie over. On the outside of the wide end of the tie, measure the width you want the tie to be. Mark this width on each side of the tie with a short length of basting thread; stitch only through the tie fabric, not into the lining.
Turn the wide end of the tie inside out, so that the lining and the end of the tie form a bag with the side seams on the outside. Lay the tie out flat again, with the interlining up and the inside-out lining underneath. With a long straightedge and tailors' chalk or a pencil, mark a straight line along the length of the tie from each basted edge line, to mark the new width of the tie. Taper the line on each side of the tie to run from the basted edge line at the end to blend into the original fold line toward the middle of the tie. Most of this line will fall on the interlining.
Carefully cut the interlining along the marked lines to remove excess width; do not cut the tie fabric. Turn the end of the tie right side out, so that the lining is on the inside again.
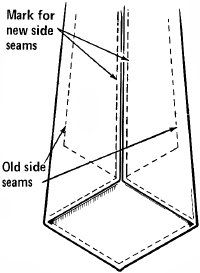
To narrow the tie fabric, fold the long edges of the tie carefully over the narrowed interlining; fold from the basted mark on each side all along the edge of the interlining to the center of the tie. Be careful not to stretch the bias edges of the fabric. Press the edges carefully to crease the tie into its new width.
With the sides of the tie fabric folded over each other, mark both sides of the lining where the fabric sides meet at the middle of the tie. From these points, mark lines upward on the lining along the tie, about 1/8 inch out from the center of the tie, to indicate where the lining will be sewn to the narrowed tie fabric. Unfold the tie and hand-stitch the lining directly to the tie fabric along the marked lines, for the entire 6- to 8-inch length of the lining.
Lay the tie out flat. With a long straightedge, draw a line on each side of the tie fabric to mark the new edge, from 3/8 inch outside the new lining-fabric seam to meet the old fabric edge at the center of the tie. Carefully cut off the excess tie fabric along the marked lines.
To finish the tie, fold the sides over each other along the new edge creases. Leave the edge of the bottom side raw. On the overlapping side, turn the raw edge under about 1/2 inch, folding both fabric and lining from the end of the tie to the center. Taper the fold to match the old fold at the center of the tie. Carefully press the folded edge flat; make sure you don't stretch the raw edge of the fabric.
Finally, fold the tie together again, with the pressed-under side folded over the raw edge of the other side. Blind-stitch the sides of the tie together along the middle of the tie, using fairly loose stitches; be careful not to stitch through to the front of the tie. Remove the basting threads and replace the label.
So far, we've looked at breathing new life into old or damaged clothing. But what about old or damaged shoes? Next, learn how to revitalize worn shoes by giving them a new sole.