Science Projects for Kids: Weather and Seasons

Build a Weather Station with your kids so that you can measure trends and make predictions.
©2007 Publications International, Ltd.

Science projects for kids: weather and seasons are an ideal teaching tool because they keep kids engaged and clearly explain natural phenomenon, such as weather and seasons. When kids actively participate in learning, they retain knowledge longer and become inspired to study more.

Whether you're planning a classroom lesson or just looking for rainy day fun, these science projects for kids will deepen their learning about weather and seasons.

Advertisement

On the following pages, you'll get great ideas for science projects for kids: weather and seasons.

Can Frost

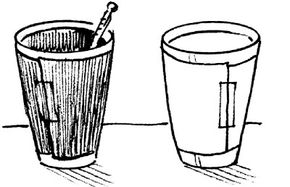
Teach children about condensation and temperature with this easy science project for kids. Find out how to make Can Frost.

Bottled Sea: Catch a Wave

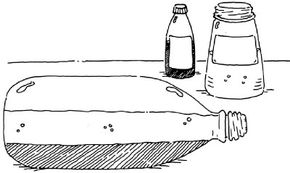
Oil and water don't mix, but together they can teach kids about the dynamic motion of waves. Learn how to prepare this science project for kids.

Clock the Wind

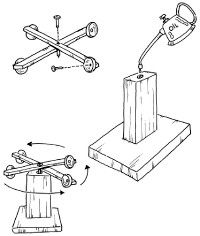
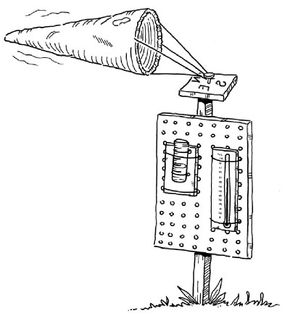
Learn how to build a device with your kids that measures wind speed. Read about Clock the Wind, a science project for kids.

Foggy Notions

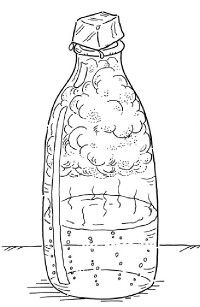
Teach kids how to make fog in a bottle with this captivating science project. Get directions on how to prepare Foggy Notions.

Blowing in the Wind

How powerful is the wind? This science project for kids will show you just how much matter the wind transports. Find out how to prepare this experiment.

So Much Pressure!

Find out how to make your very own barometer with your kids, and then measure the air pressure with your device. Learn to make this science project.

Testing the Air

This science project teaches kids two methods of measuring environmental pollutants in the air. Find out what you'll need to prepare this science project for kids.

Weather Station

Assemble all the tools you and your kids will need to measure changes in the weather and eventually make predictions. Learn to make this science project.

Weather Folktales

Distinguish scientific facts from creative embellishments with this science project for kids. Separate fact from fiction in folktales about weather and seasons.

Stay Cool, Stay Warm

Teach kids how much the colors they wear affect them. Stay Cool, Stay Warm is an eye-opening science project for kids that teaches a valuable lesson.

All Kinds of Weather

Help kids learn about weather and seasons all over the world. Get directions for All Kinds of Weather, a research science project for kids.

Sunrise, Sunset

This science project teaches kids to chart the movement of the earth during the different seasons. Find out how to prepare this science project.

Rain, Rain -- Go Away

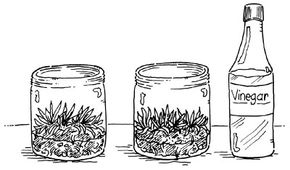
We've all heard of acid rain, but this science project illustrates its effects in a chilling way. Read about Rain, Rain -- Go Away.

Blue Skies

Why is the sky blue? This science project for kids provides a clear demonstration of the atmospheric mechanism that colors our sky.

Teach your kids how to make Can Frost, a science project that educates kids about condensation. Get directions on the next page.

Want more science projects you can do with your kids? Try:

Advertisement

Can Frost

Can Frost is a science project that teaches kids about condensation.
©2007 Publications International, Ltd.

Can Frost is an easy science project that teaches kids about condensation. Frost forms because of a change in temperature.

What You'll Need:

  • Small metal can
  • Water
  • Salt
  • Crushed ice

Learn about Can Frost

Step 1: Fill a small metal can 1/4 of the way with water.

Advertisement

Step 2: Stir 4 tablespoons of salt into the water.

Step 3: Add enough crushed ice to fill the cup, and stir the solution.

Step 4: Observe what happens on the outside of the can.

Teach kids how to create a marine environment in a bottle with the science project called Bottled Sea: Catch a Wave. Read about it on the next page of science projects for kids: weather and seasons.

Want more science projects you can do with your kids? Try:

Advertisement

Bottled Sea: Catch a Wave

Teach your kids how waves move with Bottled Sea: Catch the Wave.
©2007 Publications International, Ltd.

Bottled Sea: Catch a Wave is a science project that teaches kids how to make waves. Oil and water don't mix -- watch the waves build in this experiment.

What You'll Need:

  • Plastic soda bottle
  • Water
  • Blue food color
  • Mineral oil

Learn about Bottled Sea: Catch a WaveStep 1: Fill a plastic soda bottle about 2/3 of the way with water. Add blue food color to the water and swirl.

Advertisement

Step 2: Fill the remainder of the bottle with clear mineral oil. Fill it all the way so that no air remains when the bottle is capped.

Step 3: Set the bottle down horizontally, and you'll see a layer of oil on top with a layer of blue water underneath it. Tilt the bottle from side to side slowly, and watch the wave flow.

Step 4: Try tilting one side up before the wave reaches it to see the wave crash on shore and reverse directions.

Clock the Wind is a science project that teaches kids to build a device to measure wind speed. Get directions on the next page of science projects for kids: weather and seasons.

Want more science projects you can do with your kids? Try:

Advertisement

Clock the Wind

Help your kids Clock the Wind with a device you make together.
©2007 Publications International, Ltd.

Clock the Wind is a science project that teaches kids how to build their very own device to measure wind speed. How fast is the wind blowing today? Make a wind-speed gauge that will tell you.

What You'll Need:

  • Two hollow balls (rubber balls, tennis balls, or ping-pong balls)
  • Nails
  • Two sticks of the same length
  • One-foot wooden 2 x 4
  • Drill
  • Wooden board for a base
  • Wax or oil

How to Make Clock the Wind

Step 1: Ask an adult to help you with this project. First, take two small, hollow balls and cut them in half. Nail the ball halves to the ends of two sticks with the cut sides facing outward as shown in the illustration. Paint one half ball a different color from the other three.

Advertisement

Step 2: Next, nail the two sticks together at right angles so they form an X. Make sure you join the two sticks at their exact centers, so the joined sticks will balance on the nail. Use a long nail so that the end of the nail comes through both sticks.

Step 3: Now make the base. Have an adult drill a hole in the end of a one-foot length of a wooden 2 x 4. The hole should be a bit larger than the nail that holds the two sticks together.

Step 4: Attach the 2 x 4 to a wooden base, and set the nail in the drilled hole. (Put a little wax or oil in the hole so the gauge will turn easily.)

Step 5: Now, put your wind-speed gauge in the wind. Count the number of times it turns around in 30 seconds. (Count by the painted half ball.) Write that number down and divide it by five. The answer is the wind speed in miles per hour.

Teach kids to make fog in a bottle with the Foggy Notions science project for kids. Read about it on the next page of science projects for kids: weather and seasons.

Want more science projects you can do with your kids? Try:

Advertisement

Foggy Notions

Teach kids to make fog in a bottle with Foggy Notions.
©2007 Publications International, Ltd.

Foggy Notions is a science project that teaches kids about fog. Did you ever wonder what exactly fog is? This project will help clear up the mystery.

What You'll Need:

  • Bottle
  • Hot water
  • Rubbing alcohol
  • Ice cube

Learn About Foggy Notions:

Step 1: You've probably seen fog. That's because when fog is around, it's about all you can see. Well, fog is a cloud that forms very close to the ground.

Advertisement

Step 2: In nature, when a mass of cold air bumps into a mass of warm humid air, millions of tiny droplets of water are formed. That's fog.

Step 3: Here's a way to get some cold air and some warm air together and make fog: Fill a bottle 1/3 full of very hot water. Add a few drops of rubbing alcohol. Put a piece of ice over the top of the bottle and watch fog develop.

Blowing in the Wind is a science experiment for kids that measures the objects that are carried on air currents. Read about this science project on the next page of science projects for kids: weather and seasons.

Want more science projects you can do with your kids? Try:

Advertisement

Blowing in the Wind

Blowing in the Wind is a science project that teaches kids how to harness the power of the wind. The wind is sometimes like a bus or train. It picks up passengers from one place and transports them to another.

What You'll Need:

  • Cardboard
  • String
  • Vegetable oil or petroleum jelly

Learn About Blowing in the Wind:

Step 1: Get a piece of cardboard that is the size of a piece of notebook paper or larger. Make a small hole on one end of the cardboard, and tie a piece of string through the hole. Smear one side of the cardboard with vegetable oil or petroleum jelly.

Advertisement

Step 2: On a windy day, hang the cardboard from a tree using the string. Make sure the oily side of the cardboard is facing the wind. Leave the cardboard in the wind for an hour or more. Then go back and see what the wind has carried onto the cardboard. You may find seeds, insects, pollen, dust, or other tidbits of nature.

Step 3: Some plants (like the dandelion) use wind to help scatter their seeds far away. Sometimes the seeds can be carried for several miles or more! Small spiders can hang by their thread and let the wind blow them from spot to spot. What other ways can you think of to use wind?

So Much Pressure! is a science project that teaches kids to make their own barometer. Get directions for this science project on the next page of science projects for kids: weather and seasons.

Want more science projects you can do with your kids? Try:

Advertisement

So Much Pressure!

So Much Pressure! is a science project that teaches kids how to make their very own barometer. You and your kids can make a water barometer that will show you the changes in the air pressure.

What You'll Need:

  • Ruler
  • Modeling clay
  • Water
  • Bowl
  • Clear plastic bottle
  • String
  • Paper
  • Pen or pencil

Learn About So Much Pressure!

Step 1: First, stick a ruler into a lump of modeling clay. Then put the clay and ruler in the bottom of a bowl. (The ruler should be standing up straight.) Put about three inches of water into the bowl.

Advertisement

Step 2: Next get a narrow, clear plastic bottle. Fill it about 3/4 full of water. Cover the top of the bottle with your hand, turn it upside down, and put it into the bowl next to the ruler. Once the bottle top is under­water, you can take your hand away. With the bottle still standing upside down, tie the ruler to the bottle with string.

Step 3: Cut a strip of paper about four inches long. Make a scale on it by making a mark every 1/4 inch. Halfway down the strip, make a longer line to show the halfway mark. Tape this strip of paper to the bottle with the halfway mark at the same level as the water in the bottle.

Step 4: Now you have a water barometer. The water in the bottle will move up and down as the air pressure changes. As the air pressure in the room increases, it will push down on the water in the bowl, forcing water up into the bottle. Then you can see yourself that the air pressure is high. If the air pressure is low, the bowl's water will rise, the bottle's water will sink, and you'll get a lower pressure reading.

Testing the Air is a science project that teaches kids how to measure environmental pollutants. Learn how to prepare this science project on the next page of science projects for kids: weather and seasons.

Want more science projects you can do with your kids? Try:

Advertisement

Testing the Air

Testing the Air is a science project that teaches kids to test air quality. How clean is the air around your home?

What You'll Need:

  • Stiff cardboard
  • Safe scissors
  • Hole puncher
  • String
  • Petroleum jelly
  • Magnifying glass
  • Rubber bands

Learn How to Test the Air:

Step 1: With two simple tests, you can check the air for common pollutants. In the first test, measure how much dust, dirt, soot, and other floating material is in the air.

Advertisement

Step 2: To do this, cut two pieces of stiff cardboard into a four-inch square. Punch a hole on one corner of one piece and put a string through it for hanging. Coat both sides with petroleum jelly and hang the cardboard up under the eaves of your house.

Step 3: Coat one side of the second piece and lay it flat in the shade, also sheltered under the eaves of your house. Leave both pieces in place for a day.

Step 4: Examine both cardboard squares with a magnifying glass and see if you can count the number of small particles sticking to them. Which has more particles: the cardboard that was lying flat or the one hanging?

Step 5: To test for invisible gaseous pollutants, stretch three or four rubber bands over a piece of cardboard. Lay them in a shady place. Check the rubber bands each day. The faster they become brittle, the more pollutants there are in the air.

Step 6: Try both of these tests in two very different places to compare pollutant levels. You might try them in the middle of a city, then in a forest or in the country.

Learn how to make a Weather Station with your kids so that you can measure and predict the weather. Get directions for this science project on the next page of science projects for kids: weather and seasons.

Want more science projects you can do with your kids? Try:

Advertisement

Weather Station

Build a Weather Station with your kids and learn to predict changes.
©2007 Publications International, Ltd.

Build a fully functional Weather Station with your kids, and then teach them how to use the instruments. Use your readings to track the weather. Then try to make predictions.

What You'll Need:

Advertisement

  • Stake
  • Small piece of peg board (about eight inches wide and one foot long)
  • White spray paint
  • Wire
  • Thermometer
  • Rain gauge
  • Wind sock or weather vane (See Clock the Wind)
  • Paper to make weather chart
  • Hygrometer
  • Barometer (See So Much Pressure!)

How to Make a Weather Station:

Step 1: In a ventilated area, paint the stake and peg board white using outdoor spray paint. Be sure to wear safety goggles and have an adult supervise.

Step 2: Nail the pegboard to the stake so the top of the board is one foot below the top of the stake. Use wire to fasten a thermometer and rain gauge to the pegboard.

Step 3: Fasten a weather vane or wind sock to the top of the stake. The north side of the wind vane's direction indicator should be on the same side as the thermometer.

Step 4: Find an open area with no overhanging trees or large buildings in the way. Have an adult help you dig a hole about 18 inches deep. Sink your stake into the bottom of it so that the side of the station with the thermometer is facing north. Then fill it back in and stomp the soil down firmly.

Step 5: Keep a weather notebook. Take readings of temperature, wind direction (and speed, if you made the wind sock), and rainfall daily.

Step 6: If you have a hygrometer and a barometer you can add readings of humidity and air pressure to your notebook. Compare your readings to those you see in the newspaper. See if you can predict the weather.

Weather Folktales are a great way for kids to combine science and creativity. Read about the Weather Folktales science project on the next page of science projects for kids: weather and seasons.

Want more science projects you can do with your kids? Try:

Advertisement

Weather Folktales

Some Weather Folktales can be used to predict the weather.
©2007 Publications International, Ltd.

Weather Folktales are a science project for kids that combines science and creativity. See if you and your kids can determine which old beliefs are based on fact and which are pure fancy!

What You'll Need:

  • Notebook
  • Pen

Learn About Weather Folktales:Step 1: Our ancestors didn't have television weather forecasters, satellite weather photos, or fancy instruments to predict the weather. They had to rely on signs from nature. Some old folklore predictions are highly accurate, while others are mere superstition.

Advertisement

Step 2: Read these folk sayings about the weather. Which ones do you think give accurate predictions?

  1. Red sky in the morning, sailors take warning. Red sky at night, sailor's delight.
  2. Crows on the fence mean rain, while crows on the ground mean fine weather.
  3. If a cow moos three times in a row, rain will come soon.
  4. A ring around the sun or moon means rain is coming soon.
  5. Roosters crowing at night predict rain.
  6. High clouds mean fine weather, low clouds mean rain is coming.
  7. Wide brown bands on a woolly bear caterpillar mean a mild winter.

Step 3: Make your own observations of these signs to find out, then record them in your notebook. Which do you think are more reliable: signs that rely on animals or signs that relate to the sky and clouds?

Stay Cool, Stay Warm is a science project that teaches kids how color and temperature are related. Learn this science project on the next page of science projects for kids: weather and seasons.

Want more science projects you can do with your kids? Try:

Advertisement

Stay Cool, Stay Warm

Stay Cool, Stay Warm teaches kids how temperature affects water.
©2007 Publications International, Ltd.

Stay Cool, Stay Warm is a science project that teaches kids the importance of temperature in the environment. You and your kids will learn that the way you dress can affect your personal environment.

What You'll Need:

  • Two identical drinking glasses
  • One sheet of black paper
  • One sheet of white paper
  • Tape
  • Water
  • Thermometer

Learn About Stay Cool, Stay Warm:

Step 1: Whether the weather is hot or cold, the colors you wear can affect your body temperature. Want to test the theory?

Step 2: Take two identical drinking glasses. Wrap one in black paper and tape it securely. Wrap the other in white paper and tape it in place.

Step 3: Now fill both glasses with lukewarm water and put them on a porch or picnic table. Allow the glasses to stand undisturbed in direct sunlight for about an hour.

Step 4: Now use a thermometer to measure the temperature of the water inside each glass. Then decide which color of clothes will help you stay warm or cool. Odds are that your choice will be crystal clear.

All Kinds of Weather is a research science project that teaches kids about weather patterns all over the world. Get directions on the next page of science projects for kids: weather and seasons.

Want more science projects you can do with your kids? Try:

All Kinds of Weather

All Kinds of Weather is a science project for kids that teaches children about weather around the world. The answers to all your kids' weather questions are as close as your library.

What You'll Need:

  • One or more books on weather
  • Paper
  • Pen

Learn About All Kinds of Weather:Step 1: Think of some weather questions you'd like to know the answers to. For example: Have you ever wondered what are the coldest, hottest, rainiest, and snowiest places on Earth?

  • Antarctica is the coldest at -128.6 degrees Fahrenheit.
  • Al Aziziyah, Libya, is the hottest at 136 degrees Fahrenheit.
  • The rainiest place in the world, Kukui, Hawaii, gets 460 inches every year.
  • Washington's Mount Rainier Paradise Ranger Station, the snowiest place, gets 1,122 inches in the winter season.

Step 2: Have you wondered what causes tornadoes, thunder, or lightning? Check out some books about weather and find out. Discover your own fun weather facts, write them down, and share them with others.

Sunrise, Sunset is a science project that teaches kids how the earth moves in relation to the sun. Learn how to track these movements on the next page.

Want more science projects you can do with your kids? Try:

Sunrise, Sunset

Sunrise, Sunset is a science project for kids that teaches how daylight changes with the seasons. You and your kids will have to wake up early to keep track of where the sun rises and sets.

What You'll Need:

  • Paper
  • Pen

Learn About Sunrise, Sunset:

Step 1: Get up early one morning and watch the sun rise. You'll see it best in an open area, such as a beach, lake shore, or large, flat field. Notice where the sun rises in relation to fixed objects (such as hills or trees) near the horizon.

Step 2: Keep notes about this. (For example, you might write: "Sun rose just to the right of the big hill.") Make a diagram showing the eastern and western horizons. Mark where you saw the sun rise.

Step 3: The same day (or as soon as you can), go to the same place and watch the sun set. Again, notice where the sun sets in relation to hills or trees on the horizon. Mark the spot on your diagram.

Step 4: About three months later, repeat the activity. Notice where the sun rises and sets in relation to those same hills or trees. (Check your notes from last time.) Mark the spots on your diagram.

Has the sun moved? The sun always rises in the east and sets in the west. It's really the Earth that has moved. As the Earth orbits the sun, it changes how much it tilts toward the sun. The result is that the sun rises and sets in different places on the horizon. Be careful not to look directly at the sun.

We've all heard of acid rain, but the next science project for kids demonstrates its effects dramatically. Read about Rain, Rain -- Go Away on the next page of science projects for kids: weather and seasons.

Want more science projects you can do with your kids? Try:

Rain, Rain -- Go Away

See the effects of acid rain firsthand with Rain, Rain -- Go Away.
©2007 Publications International, Ltd.

Rain, Rain -- Go Away is a science project that teaches kids about the effects of acid rain. Sometimes chemicals get in the air and mix with water to form "acid rain."

What You'll Need:

  • Water
  • Vinegar
  • Two jars
  • Sod

Learn about Rain, Rain -- Go Away:

Step 1: Put 1/4 cup of water in one of the jars. Ask an adult to cut two small squares of sod from your lawn or buy some sod at a nursery. Push one square of sod down into a jar so that the sod's soil is in the water.

Step 2: Then put 1/4 cup of vinegar in the other jar. Push the second square of sod down into the jar, so the soil is in the vinegar.

Step 3: Now place both jars in a warm, sunny place, and watch what happens over the next several days.

Step 4: Vinegar is an acid, like the acid in acid rain. Acid rain is a worldwide problem. It can be caused by smoke from factories, burning coal, and even car exhaust. In addition to harming plants, acid rain also pollutes bodies of water, kills fish, and destroys rocks and buildings!

Why is the sky blue? The science project for kids called Blue Skies uses visual aides to explain this natural phenomenon. Read about it on the next page of science projects for kids: weather and seasons.

Want more science projects you can do with your kids? Try:

Blue Skies

Blue Skies is a science project for kids that explains how light is refracted through our atmosphere. Teach your kids how waves of light color our world.

What You'll Need:

  • Flashlight
  • Table
  • Flour

Learn About Blue Skies:

Step 1: Why is the sky blue? When the white light of the sun filters through our atmosphere, it scatters into every color of the rainbow and every possible wavelength. Our atmosphere makes it blue.

Step 2: This simple experiment will give you an idea of how that scattering works and why weather patterns can cause a colorful shift.

Step 3: Turn a flashlight on outside at night. Set the flashlight on a table so its beam shines in midair in front of you. Now sprinkle flour in front of the beam.

Step 4: You should see dozens of white flashes as each piece of flour or dust reflects light waves and sends the color signal straight to your eyes. That's how our atmosphere sends flashes of color to your eyes to make the sky seem so blue.

Want more science projects you can do with your kids? Try:

ABOUT THE PROJECT DESIGNERS

Testing the Air by Maria Birmingham, Karen E. Bledsoe, and Kelly Milner Halls

Stay Cool, Stay Warm by Maria Birmingham, Karen E. Bledsoe, and Kelly Milner Halls

Blue Skies by Maria Birmingham, Karen E. Bledsoe, and Kelly Milner Halls

Advertisement

Loading...