Ssssssseriously, what could be ssssssweeter than this snake on your zipper? Willie B. Thomas / Getty Images
Give a cardigan sweater or jacket -- or even a backpack or school bag -- a whole new look with one of these snazzy beaded zipper pulls. These colorful creations will help your stuff (luggage, perhaps?) or your clothes stand out from the crowd.
Best of all, with our easy, step-by-step directions and illustrations, these zipper pull projects are a snap to make, even for kids. After learning a few easy steps, kids will be active for hours. These zipper pull projects will provide hours of fun.
Advertisement
This article offers instructions for making all of the following zipper pull designs. So pick your favorite to get started, or go in order and make all five!
This zipper chic zipper pull is easy to make, believe it or knot! Follow our step-by-step instructions to create something cool, just by strategically tying knots. Once you get the hang of it, what could be easier?
What You'll Need:
Colored leather cords, wild-colored shoelaces, lanyard lacings, or satin cords
Advertisement
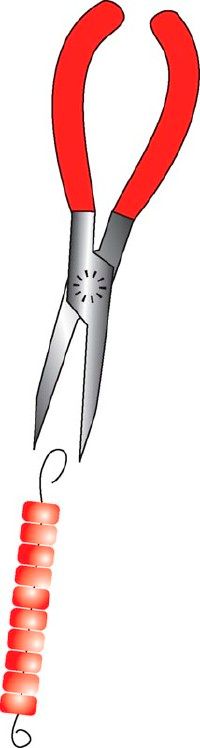
Big beads
Jacket, backpack, or purse zipper
What To Do:
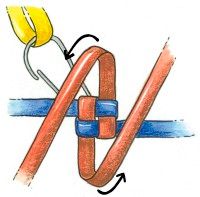
Choose the color, pattern, and type of cords or laces you'll use according to how you plan to use the zipper pulls. Mixing colors creates cool effects and makes learning this process easier.
Start with two laces, one of each color, about 12 inches long. Thread the two laces through the zipper's pull and fold the laces in half so the bottoms are even. You now have four laces to work with.
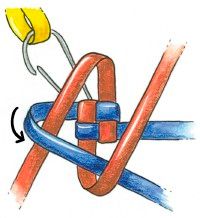
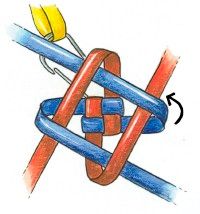
Arrange the light-colored laces in the middle and the dark ones on the outside. The lighter laces will always hang straight down the middle. With the two dark laces, make a simple knot in front of the lighter laces. Pull tightly.
Now use the dark laces to tie a simple knot behind the lighter laces. Pull tightly, and continue knotting above and behind the light-colored laces until the zipper pull is as long as you want it.
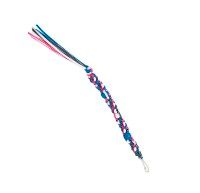
Thread a large bead on the end of the laces and tie them off.
Another option: Make an easy variation of this craft by using a metal spring clip or a key ring. Use the same instructions for the zipper chic zipper pull, only begin by threading the laces through the swivel base of the metal clip instead. Now slip your metal key ring onto the swivel base of the spring clip. Clip your keys onto your belt loop and voilà! Funky, cool keys to go.
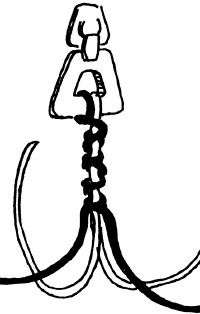
Once you've mastered this basic model, you may be ready for sssssomething a little more ssssssly. Continue to the next page to learn how to make a zipper pull in the shape of a ssssssssssnake.
For more fun craft projects and ideas for kids, see:
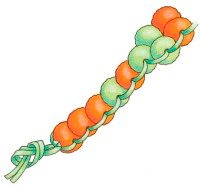
This sly snake zipper pull can double as a guardian for whatever item it's attached to. And although it looks a bit tricky, this sneaky snake is easy to make with the instructions and illustrations below.
What You'll Need:
Lanyard hook
3 yards green plastic lanyard
1/2-inch pom beads: 26 green, 14 orange, 2 yellow
Scissors
What To Do:
What To Do:
Advertisement
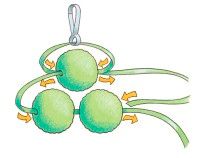
1. Tie the center of the plastic lanyard to a lanyard hook, forming two tails. String a green pom bead on one lace. String the other lace through the same bead in the opposite direction. Pull the bead snug to the lanyard hook.
2. String two green pom beads on one lace. String the other lace through the same beads in the opposite direction. Pull snug against the first pom bead.
You've just made thetip of the snake's head.
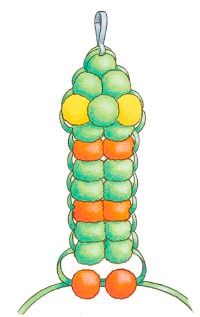
3. String one yellow pom bead, one green, and another yellow on one lace. String the other lace through the same beads in the opposite direction. Pull snug to the second row of pom beads.
4. On the next row, string two green pom beads on one lace. String the other lace through the same beads in the opposite direction.
5. Repeat, this time with a row of two orange pom beads. Continue in this manner with two rows of green beads, followed by one row of orange beads, until you have 18 total rows.
Follow this guide toget your snake going.
6. To make the snake's tail, string a green pom bead on one lace. String the other lace through the same bead in the opposite direction. Pull snug. Add a single orange row, a single green row, and three more single orange rows. (Is that a rattle?!)
7. Tie the laces in a double knot and trim the ends. Attach this zipper pull to your backpack for a sleek, sly look!
Finish your snake witha sleek, tapered tail.
Next up? A friendlier sort of beaded zipper pull that puts your name right on the item of your choice. Continue to the next page for directions.
For more fun craft projects and ideas for kids, see:
Contrary to popular belief, snake skin is not clammy or slimy but smooth, dry, and slightly cool to the touch.
Advertisement
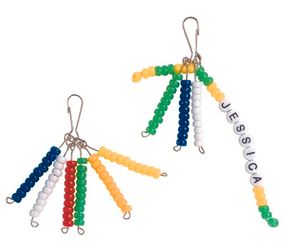
Buddy Bead Tags Zipper Pulls
How many buddy bead tags can you collect?
These beaded beauties are fun for you and your friends to make together and trade. Start by making a buddy bead tag zipper pull with your name on it -- then think of all the other messages you can create. Collect a whole rainbow of tags, then attach them to bookbags, jackets, and more!
What You'll Need:
12 inches stretchy beading cord
Advertisement
7mm silver jump rings
Pony beads in red, blue, green, white, orange, and yellow
Alphabet beads
Lanyard hook
Six silver stem beaders, 2 inches long
Scissors
Needle-nose pliers
What To Do:
1. Tie the center of the 12-inch piece of stretchy beading cord to a jump ring.
Curl up the ends of the wire so the beads stay put.
2. String six colored pony beads onto the beading cord, any colors you like.
Use the alphabet beads to add your name, then string on six more colored pony beads. Tie the last pony bead to the cord to secure, and trim the end.
3. Thread nine colored pony beads onto the other half of the cord. Tie the last bead to the cord to secure, and trim the end.
Then slip the jump ring with your name and bead pattern onto a lanyard hook.
4. To make the buddy bead tags you can trade and swap, thread 10 of the same-color pony beads onto a stem beader (or create your own pattern).
Curl up the end of each stem with the needle-nose pliers, securing the beads to the wire. You should end up with six beaded stem beaders.
5. Now that you've made your buddy bead tags, trade them with your friends! For example, give blue tags to the friends you've made at school, and ask your special pals around the neighborhood for orange tags.
Use a jump ring to attach your Buddy Bead Tags to the lanyard hook with your name and bead pattern, then put them on your jacket, backpack, shoes -- or wherever you'd like!
Keep tags for trading on aseparate ring for easy access.
This next zipper pull for you to make is a classic, and it will put all of your craft skills to the test. Learn what you need to know on the next page.
For more fun craft projects and ideas for kids, see:
Ever made a friendship bracelet with lanyard? If so, you may already have the skills you need to create this classic zipper pull. This cool craft project puts a spin on the traditional square stitch by making it a spiral square stitch.
And, you'll also learn how to add bead accents. Make a twisty zipper pull for your favorite jacket or raincoat, or it can be come an eye-catching key chain.
Advertisement
What You'll Need:
Two lanyard laces: 1-1/3 yards blue, 1-1/3 yards red
Lanyard clip
Ruler
Scissors
What To Do:
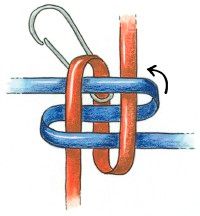
1. Insert one end of the red lace through the lanyard clip. Position the clip at the center of the lace. Place the center of the blue lanyard lace below the clip.
2. Fold the top red lace down over the blue lace. Fold the left blue lace to the right over the top red lace.
Fold carefully to startyour lanyards off right.
3. Fold the back red lace up over the front blue lace. Fold the back blue lace over the right red lace and under the left red lace.
Can you see thesquare shape forming?
4. Pull all laces tight. Insert the anchor lace or safety pin through the lanyard clip to anchor.
5. Diagonally fold the top red lace down over the left blue lace. Diagonally fold the bottom red lace up over the right blue lace.
Aim at an angle,not straight across.
6. Diagonally fold the left blue lace over the red lace closest to it and under the other red lace.
Go over and then underwith the blue lace.
7. Diagonally fold the right blue lace over the red lace closest to it and under the other red lace.
Now the nextsquare is forming...
8. Pull all laces tight. Repeat steps 5 through 7 to make 1-3/4 inches of braid.
9. Tie all the laces together in a tight knot. Trim the ends to 1-1/2 inches. Remove the anchor.
Variation for the Spiral Square Stitch
What You'll Need:
Four different colored lanyard laces: 3 yards each plus an additional 6-inch piece
Lanyard clip
Ruler
Scissors
Three pony beads, 6x9mm
What To Do:
1. Hold all 3-yard laces together with ends even. Insert the laces through the lanyard clip. Position the clip at the center of the laces.
2. Wrap the 6-inch piece of lace around the folded laces below the clip. Tie the 6-inch lace in a knot. Trim the ends. Insert the anchor lace or safety pin through the clip to anchor.
3. Keeping color groups together, separate the laces as shown in the photo below.
4. Follow the square stitch technique explained in steps 2 and 3 of the classic zipper pull directions above. Pull laces tight.
5. Follow the spiral square stitch technique in steps 5 through 7 of the Classic Zipper Pull directions, keeping color groups together. Pull laces tight. Continue stitching until you have 3/4 inch of braid.
6. To add a bead, separate out four laces, one of each color. Thread these four laces through a pony bead. Push the bead directly under the braid. The other laces will fall on the outside of the bead.
Cool colors, twisty shape, and bead accents -- what's not to like?
7. Regroup the lace colors below the bead and follow the same stitching and beading techniques as listed in steps 5 and 6 of these directions to continue.
To finish, pull all the laces tight after the last stitch. Tie the laces in a knot. Trim the ends and remove the anchor.
To transform this zipper pull into a key chain, simply clip it to a split ring, which is available at any craft store. Now Mom and Dad -- or you, for that matter -- can keep all their keys in one place with this cool key chain.
For your next trick: The zippiest zipper pull of all. Learn to use lanyard and beads in yet another way on the next page.
For more fun craft projects and ideas for kids, see:
The stitch used in this zippy zipper pull is easy enough for even beginners to work with. Follow the instructions below, and your zipper will be beautiful in no time.
What You'll Need:
Two colors of cord
Advertisement
Three beads
Zipper
What To Do:
Choose two colors you want to use -- one dark and one light works best; cut each cord 12 inches long. Thread the laces through the zipper's pull, and fold the laces in half so the bottoms are even. You now have four laces to work with.
Arrange the dark-colored laces in the middle and the light ones on the
outside. With the light laces, make a simple knot in front of the middle laces.
Pull tightly.
Turn the zipper pull to the back, and tie a simple knot behind the
middle laces. Repeat knotting the laces in front and in back of the middle
laces five times.
Add a bead to the dark middle laces. Pull the light laces around the bead, and, with the dark laces, begin tying knots around the light laces.
Repeat this procedure until you have added all three beads.
End by tying five knots with the dark laces. Tie a dark and light lace together to hold the knots of the zipper pull, then repeat with the other two laces.
Leave about 3/4 inch of lace, and tie a knot at the end of each lace. Trim the ends of the laces below the knots.
With all these different zipper pulls as options, there's no need for any of your zippers to ever be boring again. And, you'll find your bags, luggage, and sweaters in a flash when you make them unique with the crafts you've created yourself. Have fun!
For more fun craft projects and ideas for kids, see: